Pesquisar

ディスカッション
· 2025年4月10日

Are you using Jupyter Notebooks with IRIS?

Are you using Jupyter Notebooks with IRIS? Are you using the vscode-iris-jupyter-server VS Code extension for your notebooking? If so, please let me know either via direct message or with a comment on this post. I'd like to hear more about how our customers are working with tool specifically, and with data science more generally.

Thanks!

1 Comment
ディスカッション (1)3
続けるにはログインするか新規登録を行ってください
記事
· 2025年4月10日 6m read

如何构建代理人工智能 RAG 应用程序: 分步指南

社区朋友们好,

传统的基于关键词的搜索方式在处理具有细微差别的领域特定查询时往往力不从心。而向量搜索则通过语义理解能力,使AI智能体能够根据上下文(而非仅凭关键词)来检索信息并生成响应。

本文将通过逐步指导,带您创建一个具备代理能力的AI RAG(检索增强生成)应用程序。

实现步骤:

  1. 添加文档摄取功能
    • 自动获取并建立文档索引(例如《InterSystems IRIS 2025.1版本说明》)
    • 实现向量搜索功能
  2. 构建向量搜索智能体
  3. 移交至主智能体(分流处理)
  4. 运行智能体

1. Create Agent Tools 添加文档摄取功能

Implement Document Ingestion: Automated ingestion and indexing of documents 


1.1 - 以下是实现文档摄取工具的代码:

    def ingestDoc(self):
        #Check if document is defined, by selecting from table
        #If not defined then INGEST document, Otherwise back
        embeddings = OpenAIEmbeddings()	
        #Load the document based on the fle type
        loader = TextLoader("/irisdev/app/docs/IRIS2025-1-Release-Notes.txt", encoding='utf-8')      
        
        documents = loader.load()        
        text_splitter = RecursiveCharacterTextSplitter(chunk_size=400, chunk_overlap=0)
        
        texts = text_splitter.split_documents(documents)
                       
        #COLLECTION_NAME = "rag_document"
        db = IRISVector.from_documents(
            embedding=embeddings,
            documents=texts,
            collection_name = self.COLLECTION_NAME,
            connection_string=self.CONNECTION_STRING,
        )

        db = IRISVector.from_documents(embedding=embeddings,documents=texts, collection_name = self.COLLECTION_NAME, connection_string=self.CONNECTION_STRING,)

向量搜索智能体(Vector Search Agent)能够自动完成文档的摄取(ingest)索引构建(index), 该新功能在InterSystems IRIS 2025.1的数据资源文件夹里) 至 IRIS 向量存储, 只有当数据尚未存在时,才执行该操作。


运行以下查询以从向量存储中获取所需数据:

SELECT
id, embedding, document, metadata
FROM SQLUser.AgenticAIRAG


1.2 - 实现向量搜索功能


以下代码为智能体提供了搜索能力:

 def ragSearch(self,prompt):
        #Check if collections are defined or ingested done.
        # if not then call ingest method
        embeddings = OpenAIEmbeddings()	
        db2 = IRISVector (
            embedding_function=embeddings,    
            collection_name=self.COLLECTION_NAME,
            connection_string=self.CONNECTION_STRING,
        )
        docs_with_score = db2.similarity_search_with_score(prompt)
        relevant_docs = ["".join(str(doc.page_content)) + " " for doc, _ in docs_with_score]
        
        #Generate Template
        template = f"""
        Prompt: {prompt}
        Relevant Docuemnts: {relevant_docs}
        """
        return template


分流代理处理传入的用户查询,并将其委托给矢量搜索代理,后者执行语义搜索操作,以检索最相关的信息。


2 - 创建矢量存储代理

以下代码实现了 矢量存储代理vector_search_agent :

  • 为智能体协同自定义交接描述规范 handoff_descriptions 
  • 明确的操作说明instructions
  • IRIS向量检索工具iris_RAG_search (使用irisRAG.py 用于文件输入和矢量搜索操作
@function_tool
    @cl.step(name = "Vector Search Agent (RAG)", type="tool", show_input = False)
    async def iris_RAG_search():
            """Provide IRIS Release Notes details,IRIS 2025.1 Release Notes, IRIS Latest Release Notes, Release Notes"""
            if not ragOprRef.check_VS_Table():
                 #Ingest the document first
                 msg = cl.user_session.get("ragclmsg")
                 msg.content = "Ingesting Vector Data..."
                 await msg.update()
                 ragOprRef.ingestDoc()
            
            if ragOprRef.check_VS_Table():
                 msg = cl.user_session.get("ragclmsg")
                 msg.content = "Searching Vector Data..."
                 await msg.update()                 
                 return ragOprRef.ragSearch(cl.user_session.get("ragmsg"))   
            else:
                 return "Error while getting RAG data"
    vector_search_agent = Agent(
            name="RAGAgent",
            handoff_description="Specialist agent for Release Notes",
            instructions="You provide assistance with Release Notes. Explain important events and context clearly.",
            tools=[iris_RAG_search]
    )


3 - 移交分流 (主要代理)


以下代码实现了将处理过的查询路由到分流代理(主协调器)的切换协议:

 triage_agent = Agent(
        name="Triage agent",
        instructions=(
            "Handoff to appropriate agent based on user query."
            "if they ask about Release Notes, handoff to the vector_search_agent."
            "If they ask about production, handoff to the production agent."
            "If they ask about dashboard, handoff to the dashboard agent."
            "If they ask about process, handoff to the processes agent."
            "use the WebSearchAgent tool to find information related to the user's query and do not use this agent is query is about Release Notes."
            "If they ask about order, handoff to the order_agent."
        ),
        handoffs=[vector_search_agent,production_agent,dashboard_agent,processes_agent,order_agent,web_search_agent]
    )


4 - 运行代理

以下代码:

  1. 接受用户输入
  2. 唤醒试运行代理triage_agent
  3. 将查询路由到矢量搜索处理Vector_Search_Agent 进行处理
@cl.on_message
async def main(message: cl.Message):
    """Process incoming messages and generate responses."""
    # Send a thinking message
    msg = cl.Message(content="Thinking...")
    await msg.send()

    agent: Agent = cast(Agent, cl.user_session.get("agent"))
    config: RunConfig = cast(RunConfig, cl.user_session.get("config"))

    # Retrieve the chat history from the session.
    history = cl.user_session.get("chat_history") or []
    
    # Append the user's message to the history.
    history.append({"role": "user", "content": message.content})
    
    # Used by RAG agent
    cl.user_session.set("ragmsg", message.content)
    cl.user_session.set("ragclmsg", msg)

    try:
        print("\n[CALLING_AGENT_WITH_CONTEXT]\n", history, "\n")
        result = Runner.run_sync(agent, history, run_config=config)
               
        response_content = result.final_output
        
        # Update the thinking message with the actual response
        msg.content = response_content
        await msg.update()

        # Append the assistant's response to the history.
        history.append({"role": "developer", "content": response_content})
        # NOTE: Here we are appending the response to the history as a developer message.
        # This is a BUG in the agents library.
        # The expected behavior is to append the response to the history as an assistant message.
    
        # Update the session with the new history.
        cl.user_session.set("chat_history", history)
        
        # Optional: Log the interaction
        print(f"User: {message.content}")
        print(f"Assistant: {response_content}")
        
    except Exception as e:
        msg.content = f"Error: {str(e)}"
        await msg.update()
        print(f"Error: {str(e)}")


在行动中观看:

更多细节,请访问 iris-AgenticAI open exchange 页面。

谢谢

ディスカッション (0)1
続けるにはログインするか新規登録を行ってください
お知らせ
· 2025年4月10日

[Video] Leveraging Data Fabric Studio in Supply Chain Management

Hi, Community!

Looking to get quicker insights from your supply chain data? See how InterSystems® Data Fabric Studio™ can help:

Leveraging Data Fabric Studio in Supply Chain Management

In this video, InterSystems supply chain experts @Ming Zhou and Mark Holmes discuss the benefits of Data Fabric Studio, including accelerated time-to-value and improved data access!

ディスカッション (0)1
続けるにはログインするか新規登録を行ってください
記事
· 2025年4月10日 2m read

Configurando uma Conexão de Tabela Vinculada ODBC/JDBC ao MySQL a partir do Iris

Devido à interpretação de SCHEMA pelo MySQL diferir do entendimento comum em SQL (como visto em IRIS/SQL Server/Oracle), nosso Assistente de Tabelas Vinculadas automatizado pode encontrar erros ao tentar recuperar informações de metadados para construir a Tabela Vinculada

(Isto também se aplica a Linked Procedures e Views)

Ao tentar criar uma Tabela Vinculada através do Assistente, você encontrará um erro semelhante a este

ERROR #5535: SQL Gateway catalog table error in 'SQLPrimaryKeys'. Error: ' SQLState: (HY000) NativeError: [0] Message: [MySQL][ODBC 8.3(a) Driver][mysqld-5.5.5-10.4.18-MariaDB]Support for schemas is disabled by NO_SCHEMA option
 

Para criar uma Tabela Vinculada a um banco de dados MySQL que emprega uma estrutura "sem schema" (o comportamento padrão), por favor, siga as instruções abaixo

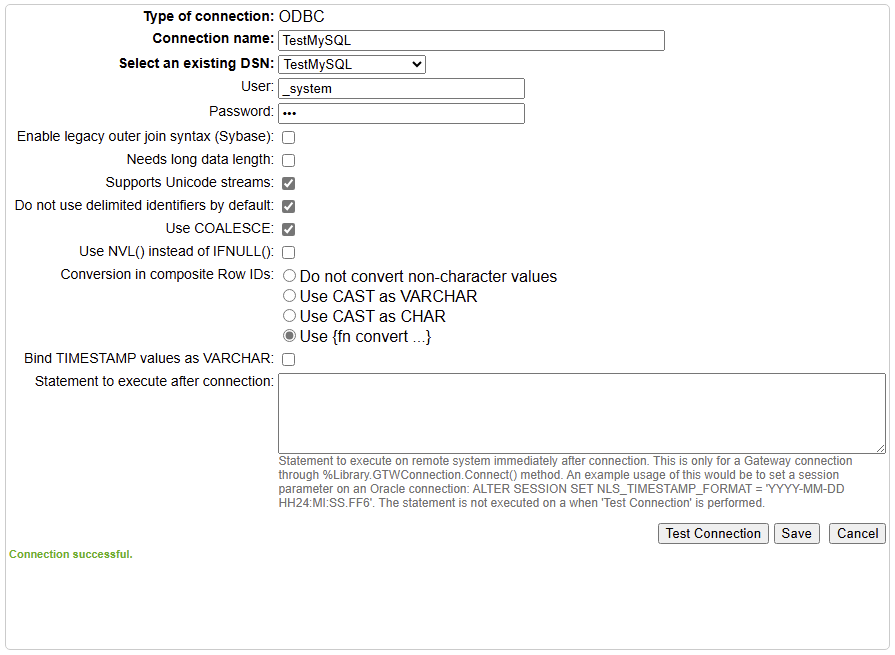
  1. Crie uma Conexão SQL Gateway
  • Configure a conexão SQL Gateway como de costume
  • Certifique-se de que a caixa de seleção "Não usar identificadores delimitados por padrão" esteja marcada
  • Clique em "Testar Conexão" para confirmar se a conexão foi bem-sucedida

  1. Use a API baseada em Terminal para Criar a Tabela Vinculada
  • Utilize a seguinte API:$SYSTEM.SQL.Schema.CreateLinkedTable() O método CreateLinkedTable() utiliza os seguintes parâmetros::

CreateLinkedTable(dsn As %String, externalSchema As %String, externalTable As %String, primaryKeys As %String, localClass As %String = "User.LinkedClass", localTable As %String, ByRef columnMap As %String = "")

  • Exemplo:Neste exemplo, usamos a tabela de sistema help_keyword  do MySQL com o camponame como chave primária:

USER>do $SYSTEM.SQL.Schema.CreateLinkedTable("MyDSN", "", "help_keyword", "name", "User.LinkedClass", "LocalTable")

Por favor, certifique-se de que todos os parâmetros estejam especificados corretamente para evitar quaisquer erros durante o processo de configuração

ディスカッション (0)1
続けるにはログインするか新規登録を行ってください
記事
· 2025年4月10日 3m read

<METHOD DOES NOT EXIST> erreurs pour les objets de la carte d'enregistrement

Le mappeur d'enregistrements complexes peut vous aider à transformer des données de fichiers texte composées de différents types d'enregistrements en messages persistants dans IRIS. Pour comprendre les bases du mappeur d'enregistrements complexes et découvrir un exemple de mise en œuvre en production, visionnez la vidéo des services d'apprentissage.

Cet article vous aidera à résoudre les problèmes liés à l'affichage du message <Method DOES NOT EXIST> lors de la gestion des objets d'enregistrement. Par exemple, lors de la purge des messages en production, des erreurs peuvent apparaître, indiquant des problèmes lors de la suppression de certains enregistrements :

<METHOD DOES NOT EXIST>zDeleteRecords+17^User.Test.Batch.1 *%ParentRemove,User.Test.Record

Le message suivant peut également s'afficher dans le journal des événements lors du traitement de fichiers utilisant une table d'enregistrements complexe :
<METHOD DOES NOT EXIST>updateArrayReferences+40^EnsLib.RecordMap.ComplexParent.1 *%ParentAdd,User.Test.Record

En vérifiant la classe spécifiée dans le message, vous constatez que la méthode indiquée après l'astérisque n'est pas incluse dans la classe d'enregistrement. Pourquoi ces méthodes sont-elles absentes de la classe ?

Si vous rencontrez cette erreur, dans le portail de gestion, accédez à Interoperability>List>Record Maps, puis à la page de la table d'enregistrements concernée (« User.Test.Record » dans ce cas). Vérifiez si les options « Allow Complex Record Mapping » ou « Allow Complex Batching » sont cochées dans les paramètres.

Si vous utilisez un type d'enregistrement dans une table d'enregistrements complexes, vous devez configurer la table d'enregistrements simple pour pouvoir l'utiliser dans la table d'enregistrements complexes. La documentation précise que « Allow Complex Batching » est une option qui spécifie si la table d'enregistrements peut être utilisée dans une table d'enregistrements complexes.

Lorsque vous cochez l'option « Allow Complex Batching », la classe d'enregistrement étend EnsLib.RecordMap.ComplexChild ; sinon, elle étend uniquement %Persistent. Vous devez cocher cette option pour tous les enregistrements que vous utilisez dans la table d'enregistrements complexes.

Dans l'exemple ci-dessus, vous constatez que la méthode *%ParentRemove n'est pas définie, car elle est définie par la classe EnsLib.RecordMap.ComplexChild. Si la classe d'enregistrement n'étend pas EnsLib.RecordMap.ComplexChild, elle ne contient pas la méthode %ParentRemove. Nous avons donc rencontré l'erreur lors de la tentative de purge.

Pour y remédier, cochez la case « Allow Complex Record Mapping » pour l'enregistrement et régénérez la classe. Si vous cochez la classe régénérée, vous constaterez qu'elle étend désormais la classe EnsLib.RecordMap.ComplexChild. La purge devrait maintenant fonctionner correctement.

ディスカッション (0)1
続けるにはログインするか新規登録を行ってください