Desde IRIS 2024, InterSystems IRIS soporta el protocolo XOAuth2, una extensión a OAuth2 que permite autenticación con OAuth2 para enviar y recibir mensajes de email. Google Mail y Google Workspace (el uso empresarial del mail de google con una dirección de empresa) requieren el uso de XOAuth2 si se desea integrar las funciones de correo desde una aplicación externa.
En este ejemplo, me centraré en una aplicación IRIS que usa el Gmail empresarial para el envio de correos. El ejemplo cubre todo el circuito desde:
- La creación de la cuenta google y su configuración para permitir acceso con OAuth2 desde una aplicación externa (IRIS).
- La configuración del cliente OAuth2 en el portal de gestión de IRIS
- Como Autorizar la aplicación Cliente en IRIS para el acceso a Gmail, y como obtener un token de refresco permanente.
- El codigo y la prueba de envio de correo desde IRIS.
- Las pruebas de validación
Como Pre-requisitos para seguir este ejemplo, son necesarios también:
- Un nombre de dominio. Este sirve como dirección de correo de la empresa en google mail. Para este ejemplo, se ha reservado "mi-empresa.es" en el Registro de "godaddy.com".
- Un servidor para IRIS que este accesible desde Internet via https (requiere generar e instalar un certificado SSL/TLS en el servidor Web). Esto es necesario para completar la autenticación OAuth con google en al URL "/csp/sys/oauth2". Para el servidor IRIS, utilizo otro dominio "scalable-iot.com", para que el lector pueda diferencia fácilmente las URLs del Servidor OAuth de Google de las URLS del cliente OAuth en IRIS, pero se podría usar el mismo dominio para Google Workspace y el servidor IRIS. Aquí, he configurado el DNS para acceder a IRIS con "https://iris.scalable-iot.com".
Por otra parte, se recomienda tener ya conocimientos genéricos de OAuth y es útil revisar como se configura OAuth en IRIS. Aquí algunas referencias en el community y un workshop del OpenExchange que cubren este tema:
https://es.community.intersystems.com/post/aprende-utilizar-oauth2-openid-connect-en-intersystems-iris-de-forma-sencilla
https://openexchange.intersystems.com/package/workshop-iris-oauth2
Flujo de Autenticación: Authorization Code
OAuth permite distintos flujos de Autenticación. En este ejemplo, el flujo que se requiere el "Authorization Code" que permite a cada usuario de IRIS dar autorización a IRIS a acceder a su cuenta de correo propia en gmail. Esta autorización se realiza por paginas Web en IRIS, que redirigen a la pagina de OAuth de google para que el usuario haga allí su login, y devuelva un token permanente (refresh token) que se guarda en IRIS. En cada envio de correo posterior desde IRIS, el refresh token, permite obtener un token para hacer la llamada al la API de gmail.
Para recordatorio, aqui el flujo de Autorización Inicial:
.png)

A la hora de enviar un correo por XOAuth2, el flujo queda como sique:
.png)

Requisitos
Una parte importante de esta configuración consistente en tener la cuenta de gmail corporativo establecida y configurada, así como el servidor de IRIS instalado y accessible por nombre DNS y con certificado instalado.
Voy a empezar con estos requisitos paso a paso.
Creació de Cuenta Google Workspace
Voy a https://mail.google.com, y selecciono "create an account" y "for work or my business". Es una cuenta que podré usar para pruebas y cancelar antes de 15 días para evitar cobros.
Google me propone probar google workspace:


Aqui selecciono nombre de la empresa "mi-empresa.es", y seleccionamos 2 a 9 empleados, así podremos validar el caso de multiples usuario que envien correos de iris si necesario.


A continuación, google pide mi información de contacto actual:


Despues pregunta si ya tengo un nombre de dominio registrado (si):

.png)
Y lo Pongo a continuación:


Despues me pide un usuario y un password para google workspace
Y despues cambio el plan a Business Starter, para tener un coste reducido por usuario (pero lo voy a cancelar antes de finalizar el periodo de prueba).
Para finalizar, despues de introducir información de pago, es necesario validar el dominio (con una entrada de DNS de tipo .TXT record o CNAME record), e finalmente añadir la entrada de MX record de google en el servidor de DNS configurado (hemos mantenido el DNS en el servidor de dominio godaddy en este caso).
Con estos pasos, tengo Una cuenta de correo de negocio "administracion@mi-empresa.es" configurada. Puedo poner "mail.google.com" en un navegador, hacer el login, y ya tengo acceso a correo.
Es muy recomendable añadir el login "2-Factores" a esta cuenta, ya que se le añade información de facturación a lo largo de las pruebas.
Instalación de IRIS
He Documentado la instalación de IRIS Community Edition en un servidor AWS en el Anexo.
Una vez instalado, se ha definido la configuración SSL de cliente con el nombre "SSLDefault".
Configuración OAuth2.0 en Google Workspace
Lo Pasos ya realizados en google son:
- creación de 1 cuenta de Workspace, con un dominio propio "mi-empresa.es"
- creación de 1 usuario en Google workspace, con la cuenta "administracion@mi-empresa.es"
Los Pasos a realizar en este apartado son los siguientes
- Definir, desde la consola del desarrollador de Google (google developer console) , un proyecto, y definir la pantalla de consentimiento OAuth.
- Esta pantalla servira a cada usuario de Google WorkSpace para que autorice a IRIS acceder a su cuenta con unos privilegios (scope) específicos
- Validar el dominio DNS donde reside el servidor IRIS (iris.scalable-iot.com)
- Crear la definición del Cliente OAuth en la consola google developer.
La Interfaz de usuario de Google cambia de vez en cuando, y las pantallas pueden ser distintas a las presentadas a continuación, pero la finalidad es la misma: habilitar OAuth y registrar el servidor de IRIS para que sea un cliente autorizado para el proyecto. En este ejemplo, as escojer una aplicación "interna" solo accesible a los usuarios de la organización, las tareas de validación en del developer console están simplificadas.
Google Developer Console
Permitir el acceso al gmail del Google Workspace desde aplicaciones externas se hace desde el Google Developer Console:
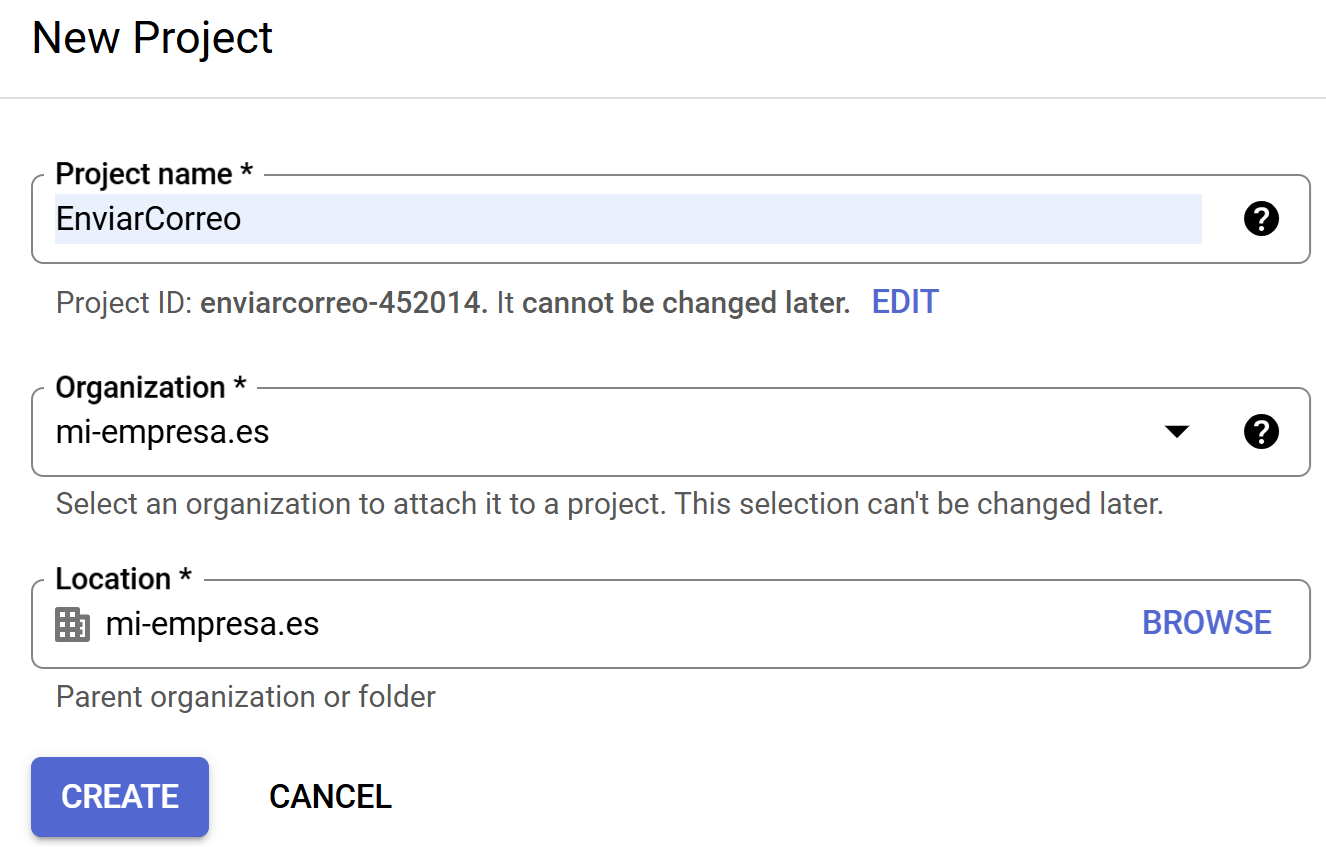
Definir un Proyecto
Es necesario crear un nuevo Proyecto, que nombro "EnviarCorreo":
Se Habilita la API de correos para este proyecto, desde "Api and Services", seleccionando "Gmail API" y "Enable".
En este nuevo proyecto, se define la pantalla de consentimiento OAuth (desde el menu "API & Services" / "OAuth consent screen"). Google nos propone un wizard en varios pasos, que relleno con:
Paso 1:

Paso 2:
.png)
Paso 3:


Y Finalizar.
Especificar el Dominio y los scopes

Despues es necesario añadir los Dominios autorizados. Para ellos, se usa el menu "Branding" para acceder a "Authorized Domains" y añadir el dominio desde donde la aplicación Cliente IRIS hace la autenticación (scalable-iot.com).
Hace falta definir los "scopes" de OAuth para la aplicación. La Pantalla de "Data Access" nos permite añadir los scopes necesarios:
Se mantienen los 3 scopes propuestos por defecto: "email", "profile", "openid", a se añade
"https://mail.google.com/", para permitir el envio de correo desde IRIS. En teoria, para solo enviar correos, el scope de "https://www.googleapis.com/auth/gmail.send" deberia ser suficiente, pero Google lo rechaza y pide en scope más completo.
La Documentación de google tiene una lista completa de scopes aquí:
https://developers.google.com/identity/protocols/oauth2/scopes


Con esto, ya se puede crear la definición de cliente OAuth en google.
Añadir la definición de cliente
En el apartado "Clients", se puede hacer click sobre "Create Client" para generar la definición de cliente. El resultado de esta etapa es que google me proporciona un ClientID y un ClientSecret que podré usar desde IRIS, para hacer la authenticación por OAuth de los usuarios.
Se seleccionan los siguientes valores
| Parametro |
Valor |
detalles |
| Application type |
Web Application |
determina el flujo de OAuth |
| Name |
irismail |
un nombre arbitrario para este cliente IRIS |
| Authorized JavaScript Origins |
https://iris.scalable-iot.com |
El DNS del cliente IRIS |
| Authorized Redirect URLs |
https://iris.scalable-iot.com/csp/sys/oauth2/OAuth2.Response.cls
https://iris.scalable-iot.com/csp/user/Mail-OAuth2.Allow2.cls |
Las paginas Web de redirección para OAuth.
Notar que la segunda pagina esta en el namespace "USER" bajo la aplicación Web "/csp/user". Se puede modificar. |
Y se acaba con el botón "create". La Validación puede tardar desde algunos minutos a varias horas.
Al volver a esta pantalla, puedo ver el ClientID y el ClientSecret generados. Son necesarios para establecer la conexión desde IRIS:
Configuración IRIS como cliente OAuth2
Ahora que el servidor de de Autenticación de OAuth esta configurado con la definición de un cliente añadida, se puede definir IRIS como cliente de OAuth para permitir que se connecte con este "ClientID" y "Client Secret". Esta definición se hace desde el portal de Gestión, configurando IRIS como Cliente OAuth.
"System Administration" / "Security" / "OAuth 2.0" / "Client"


Y se hace click sobre "Create Server Description" para añadir los detalles del Servidor OAuth de google al cual IRIS se tiene que connectar:

El botón "Discover and Save" no permite automatizar la tarea, hay que usar el botón "Manual" y rellenar los detalles de la configuración, según los valores de la pagina de configuración OpenId:
Los valores siguientes se definen en IRIS:
Aquí una copia de pantalla del resultado:
.png)
Despues de grabar esta configuración, se puede seleccionar esta fila y añadir la definición del cliente OAuth para el servidor "https//acounts.google.com/o/oauth2/auth", con el botón "Create Client Configuration":


Para finalizar esta definición, es necesario copiar el "ClientID" y "Client Secret" en la pestaña correspondiente del portal de gestión:


Autorización Interactiva de Cliente OAuth2
Con toda la configuración anterior, IRIS necesita obtener un token de acceso OAuth2 (Google le asigna un tiempo de expiración de 1 hora) y un token de actualización permanente para cada usuario que quiere acceder a su correo desde IRIS. El flujo de trabajo de OAuth2 requiere que el usuario inicie sesión en Google y acepte la operación. Para ello, el usuario tiene que ejecutar una Aplicación Web CSP en IRIS. La aplicación consta de 2 páginas CSP que se instalan en en namespace "USER", y accesibles con la aplicación Web de IRIS "/csp/user".
Se usa el flujo Authorization code para para asociar a cada usuario de IRIS ($username) una cuenta de correos en gmail, y su token de OAuth2.
A continuación el detalle del codigo de esta paginas Web de IRIS:
Creación de Paginas Web para OAuth2
Pagina Inicial:
Pagina de Finalización:
Autenticación Web de un usuario
Ahora, todo esta listo para que usuario de IRIS se autentique en Google, y autorize la aplicación de IRIS a acceder a la API de correos google mail en su nombre.
Se hace accediendo a la pagina Web:
https://iris.scalable-iot.com/csp/user/Mail.OAuth2.Allow.cls
La Paginas

Y

Al Inicial sesión en google, google advierte de los privilegios (Scopes) que la aplicación pide usar. En este caso, el scope esta limitado al envio de correos:

Al finalizar, se muestra la pagina de resultados


En este momento, se ha registrado un token y un refresh token para la app "irismail" y el usuario de iris que haya hecho el login al acceder a la página "/csp/user/Mail.OAuth2.Allow.cls". Se puede validar el contenido (verificando que para esta app y usuario haya una fila con un refresh_token) en el namespace "%SYS":
Aplicación mail con XOAuth
Para enviar el correo se usa la clase %Net.SMTP y se hace la autenticación con la clase %Net.SASL.XOAuth2 como sigue:
.jpg)