¿Se te hiela la sangre al oír hablar de OpenEHR? ¿Te ponen los pelos de punta los arquetipos?
¡Supera tus miedos con este artículo y domina OpenEHR con las capacidades de InterSystems IRIS for Health!

¿Qué es openEHR?
openEHR es una especificación abierta e independiente del proveedor, diseñada para representar, almacenar e intercambiar información clínica de forma semánticamente rica y sostenible a largo plazo. En lugar de definir estructuras de mensajes fijas (como hacen muchos estándares de interoperabilidad), openEHR separa el conocimiento clínico de la implementación técnica mediante un enfoque de modelado multicapa.
En esencia, openEHR se basa en tres conceptos fundamentales:
- Modelo de referencia (RM)
Un modelo que define las estructuras centrales utilizadas en los registros de salud, como composiciones, entradas, observaciones, evaluaciones y acciones. El modelo de registro es deliberadamente genérico y agnóstico en cuanto a tecnología.
- Arquetipos
Modelos de datos legibles por máquina (expresados en ADL o Archetype Definition Language) que definen la semántica clínica detallada de un concepto específico, como la medición de la presión arterial o un resumen del alta. Los arquetipos restringen el RM y proporcionan un vocabulario clínico reutilizable.
- Plantillas o Templates (archivos OPT)
Especializaciones basadas en arquetipos. Las plantillas adaptan los arquetipos a un caso de uso, sistema o formulario específico (por ejemplo, una plantilla de constantes vitales o una nota de alta regional). Las plantillas eliminan la opcionalidad y generan definiciones operativas que los sistemas pueden implementar de forma segura.
Veamos un ejemplo de un archivo RAW basado en una Composición (en JSON):
{
  "_type": "COMPOSITION",
  "archetype_node_id": "openEHR-EHR-COMPOSITION.diagnostic_summary.v1",
  "archetype_details": {
    "_type": "ARCHETYPED",
    "archetype_id": {
      "_type": "ARCHETYPE_ID",
      "value": "openEHR-EHR-COMPOSITION.diagnostic_summary.v1"
    },
    "template_id": {
      "_type": "TEMPLATE_ID",
      "value": "ES - AP - Diagnoses and treatment"
    },
    "rm_version": "1.0.4"
  },
  "uid": {
    "_type": "OBJECT_VERSION_ID",
    "value": "diag-1003::ehr.local::1"
  },
  "name": {
    "_type": "DV_TEXT",
    "value": "Summary of diagnoses and treatment – Moderate COPD"
  },
  "language": {
    "_type": "CODE_PHRASE",
    "terminology_id": {
      "_type": "TERMINOLOGY_ID",
      "value": "ISO_639-1"
    },
    "code_string": "es"
  },
  "territory": {
    "_type": "CODE_PHRASE",
    "terminology_id": {
      "_type": "TERMINOLOGY_ID",
      "value": "ISO_3166-1"
    },
    "code_string": "ES"
  },
  "category": {
    "_type": "DV_CODED_TEXT",
    "value": "event",
    "defining_code": {
      "_type": "CODE_PHRASE",
      "terminology_id": {
        "_type": "TERMINOLOGY_ID",
        "value": "openehr"
      },
      "code_string": "433"
    }
  },
  "composer": {
    "_type": "PARTY_IDENTIFIED",
    "name": "Dr. García"
  },
  "context": {
    "_type": "EVENT_CONTEXT",
    "start_time": {
      "_type": "DV_DATE_TIME",
      "value": "2025-11-22T08:45:00Z"
    },
    "setting": {
      "_type": "DV_CODED_TEXT",
      "value": "primary medical care",
      "defining_code": {
        "_type": "CODE_PHRASE",
        "terminology_id": {
          "_type": "TERMINOLOGY_ID",
          "value": "openehr"
        },
        "code_string": "228"
      }
    }
  },
  "content": [
    {
      "_type": "SECTION",
      "archetype_node_id": "openEHR-EHR-SECTION.diagnoses_and_treatments.v1",
      "name": {
        "_type": "DV_TEXT",
        "value": "Respiratory diagnosis and treatment"
      },
      "items": [
        {
          "_type": "EVALUATION",
          "archetype_node_id": "openEHR-EHR-EVALUATION.problem_diagnosis.v1",
          "name": {
            "_type": "DV_TEXT",
            "value": "Moderate COPD"
          },
          "archetype_details": {
            "_type": "ARCHETYPED",
            "archetype_id": {
              "_type": "ARCHETYPE_ID",
              "value": "openEHR-EHR-EVALUATION.problem_diagnosis.v1"
            },
            "template_id": {
              "_type": "TEMPLATE_ID",
              "value": "ES - AP - Diagnoses and treatment"
            },
            "rm_version": "1.0.4"
          },
          "language": {
            "_type": "CODE_PHRASE",
            "terminology_id": {
              "_type": "TERMINOLOGY_ID",
              "value": "ISO_639-1"
            },
            "code_string": "es"
          },
          "encoding": {
            "_type": "CODE_PHRASE",
            "terminology_id": {
              "_type": "TERMINOLOGY_ID",
              "value": "IANA_character-sets"
            },
            "code_string": "UTF-8"
          },
          "subject": {
            "_type": "PARTY_SELF"
          },
          "data": {
            "_type": "ITEM_TREE",
            "archetype_node_id": "at0001",
            "name": {
              "_type": "DV_TEXT",
              "value": "Diagnostic data"
            },
            "items": [
              {
                "_type": "ELEMENT",
                "archetype_node_id": "at0002",
                "name": {
                  "_type": "DV_TEXT",
                  "value": "Diagnosis description"
                },
                "value": {
                  "_type": "DV_TEXT",
                  "value": "Moderate COPD with exertional dyspnoea."
                }
              },
              {
                "_type": "ELEMENT",
                "archetype_node_id": "at0003",
                "name": {
                  "_type": "DV_TEXT",
                  "value": "Diagnosis code"
                },
                "value": {
                  "_type": "DV_CODED_TEXT",
                  "value": "J44.1",
                  "defining_code": {
                    "_type": "CODE_PHRASE",
                    "terminology_id": {
                      "_type": "TERMINOLOGY_ID",
                      "value": "ICD-10"
                    },
                    "code_string": "J44.1"
                  }
                }
              },
              {
                "_type": "ELEMENT",
                "archetype_node_id": "at0004",
                "name": {
                  "_type": "DV_TEXT",
                  "value": "Onset date"
                },
                "value": {
                  "_type": "DV_DATE_TIME",
                  "value": "2020-09-15T00:00:00Z"
                }
              }
            ]
          }
        },
        {
          "_type": "EVALUATION",
          "archetype_node_id": "openEHR-EHR-EVALUATION.medication_summary.v1",
          "name": {
            "_type": "DV_TEXT",
            "value": "Inhaled treatment for COPD"
          },
          "archetype_details": {
            "_type": "ARCHETYPED",
            "archetype_id": {
              "_type": "ARCHETYPE_ID",
              "value": "openEHR-EHR-EVALUATION.medication_summary.v1"
            },
            "template_id": {
              "_type": "TEMPLATE_ID",
              "value": "ES - AP - Diagnoses and treatment"
            },
            "rm_version": "1.0.4"
          },
          "language": {
            "_type": "CODE_PHRASE",
            "terminology_id": {
              "_type": "TERMINOLOGY_ID",
              "value": "ISO_639-1"
            },
            "code_string": "es"
          },
          "encoding": {
            "_type": "CODE_PHRASE",
            "terminology_id": {
              "_type": "TERMINOLOGY_ID",
              "value": "IANA_character-sets"
            },
            "code_string": "UTF-8"
          },
          "subject": {
            "_type": "PARTY_SELF"
          },
          "data": {
            "_type": "ITEM_TREE",
            "archetype_node_id": "at0001",
            "name": {
              "_type": "DV_TEXT",
              "value": "Associated medication tree"
            },
            "items": [
              {
                "_type": "ELEMENT",
                "archetype_node_id": "at0002",
                "name": {
                  "_type": "DV_TEXT",
                  "value": "Medication associated with the diagnosis"
                },
                "value": {
                  "_type": "DV_TEXT",
                  "value": "Inhaled salbutamol 100 mcg as needed; inhaled tiotropium 18 mcg every 24 hours."
                }
              }
            ]
          }
        }
      ]
    }
  ]
}
Este enfoque de modelado por capas permite que los sistemas openEHR se mantengan estables durante años, incluso décadas, a la vez que permite que los modelos clínicos evolucionen independientemente de la plataforma de software subyacente.
Un componente clave del ecosistema openEHR es AQL (Archetype Query Language), el lenguaje de consulta estándar utilizado para recuperar datos clínicos almacenados en repositorios openEHR.
Archetype Query Language (AQL)
AQL se inspira en SQL, pero se adapta al modelo de información de openEHR. En lugar de consultar tablas relacionales, AQL permite a los desarrolladores consultar contenido clínico estructurado dentro de las composiciones de openEHR, aprovechando las rutas de arquetipos.
Características claves de AQL
Veamos un ejemplo de AQL:
SELECT
    c/uid/value AS composition_id,
    o/data[at0001]/events[at0006]/data[at0003]/value/magnitude AS systolic,
    o/data[at0001]/events[at0006]/data[at0004]/value/magnitude AS diastolic
FROM
    EHR e
    CONTAINS COMPOSITION c
    CONTAINS OBSERVATION o[openEHR-EHR-OBSERVATION.blood_pressure.v1]
WHERE
    e/ehr_id/value = '12345'
AND
    o/data[at0001]/events[at0006]/time/value > '2023-01-01T00:00:00Z'
Comparación OpenEHR - FHIR
Técnicamente hablando, OpenEHR y FHIR son muy similares. Información basada en formato documental, API REST, etc. Veamos los conceptos principales de FHIR y OpenEHR y su correlación:
.png)
¿Qué necesitamos para implementar openEHR en IRIS for Health?
Almacenamiento de composiciones en bruto
- Que almacene las composiciones entrantes en formato JSON o XML en bruto tal y como se reciben.
- Ninguna transformación deberá modificar el contenido semántico.
- En nuestro ejemplo, trabajaremos con formato JSON, pero existen varias opciones.
Servicios API REST
Nuestra implementación debe exponer la siguiente API REST:
Servicios EHR
Para crear y localizar el “historial” de un paciente.
- POST /ehr: Creación de un nuevo EHR.
- GET /ehr/{ehr_id}: Recuperación de metadatos de EHR.
- GET /ehr?subject_id=?: Localizar un EHR basado en identificadores externos.
Servicios sobre composiciones
Para almacenar información clínica de pacientes.
- POST /ehr/{id}/composition: Confirmar una nueva composición en formato RAW. Validar con OPT cuando sea posible.
- GET /composition/{version_uid}: Recuperar una versión específica.
- GET /ehr/{id}/compositions: Lista de composiciones para un EHR.
- DELETE /composition/{uid}: Marcar la composición como eliminada (eliminación lógica).
Endpoints para consultas AQL
- POST /query/aql: que acepte una consulta de AQL, la transforme a SQL (haciendo uso de las rutas de JSON si fuera necesario) y retorne la información requerida.
Validación de composiciones en bruto
Tenemos que forzar la validación de composiciones RAW basadas en archivos OPT2, no podemos guardar en nuestro repositorio ningún JSON que recibamos.
Implementación de openEHR en IRIS for Health
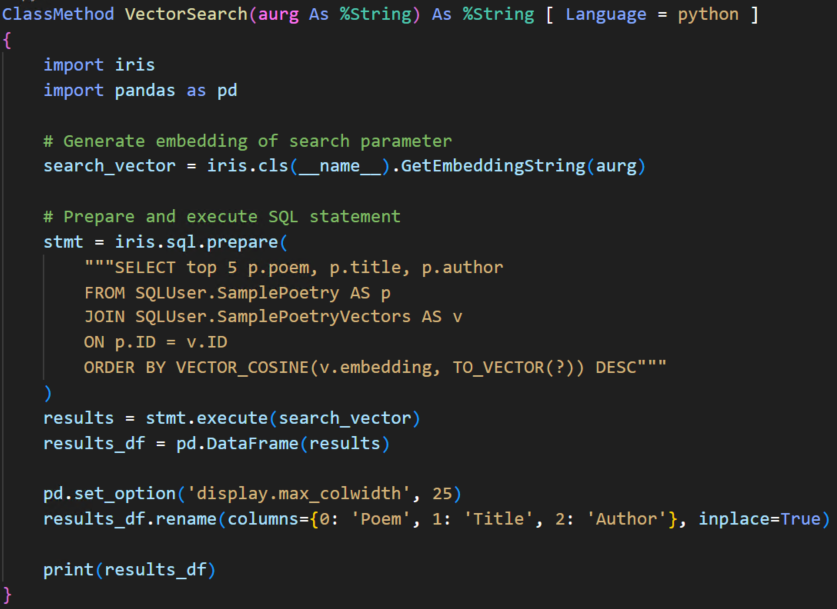
Bueno, implementar todas las funcionalidades disponibles en un servidor openEHR llevará algún tiempo, por lo que me centraré en las funcionalidades principales:
Uso de una aplicación web para implementar un servicio API REST
Publicar una API REST es muy sencillo, solo necesitamos dos componentes: una clase que extiende %CSP.REST y un nuevo registro en la lista de aplicaciones web. Veamos la cabecera de nuestra clase %CSP.REST extendida:
.png)
Como puede ver, hemos definido todas las rutas mínimas requeridas para nuestro repositorio. Gestionamos las composiciones, los archivos OPT2 para las validaciones RAW y, finalmente, la ejecución de consultas AQL.
.png)
Para nuestro ejemplo, no definiremos ninguna configuración de seguridad, pero se recomienda la autenticación JWT.
Bien, ya tenemos nuestra definición de aplicación web y nuestra clase %CSP.REST, ¿qué más?
Validación de composiciones en bruto
openEHR no es nada nuevo, por lo que se puede suponer que existen varias bibliotecas para soportar algunas funcionalidades, como la validación de archivos RAW. Para este ejemplo, hemos utilizado y personalizado la biblioteca Archie, una biblioteca de código abierto desarrollada en Java para validar composiciones RAW con archivos OPT2. El validador es un archivo JAR configurado desde el servidor de lenguaje externo (por defecto en la implementación de imágenes de Docker) y que se invoca antes de guardar el archivo RAW mediante la funcionalidad JavaGateway:
.png)
set javaGate = $system.external.getJavaGateway()
set result = javaGate.invoke("org.validator.openehr.Cli", "validate", filePath, optPath)
Si se valida el archivo raw, el documento JSON se guardará en la base de datos.
Almacenamiento en bruto de JSON
Podríamos usar DocDB, pero queremos aprovechar al máximo el rendimiento de las bases de datos SQL. Uno de los mayores problemas de openEHR es el bajo rendimiento al consultar documentos, por lo que preprocesaremos las composiciones para obtener información común a todos los tipos de composiciones y optimizar las consultas.
Nuestra clase Composition define las siguientes propiedades:
Class OPENEHR.Object.Composition Extends (%Persistent, %XML.Adaptor) [ DdlAllowed ]
{
Property ehrId As %Integer
Property compositionUid As %String(MAXLEN = 50)
Property compositionType As %String
Property startTime As %DateTime
Property endTime As %Date
Property archetypes As list Of %String(MAXLEN = 50000)
Property doc As %String(MAXLEN = 50000)
Property deleted As %Boolean [ InitialExpression = 0 ]
Index compositionUidIndex On compositionUid
Index ehrIdIndex On ehrId
Index ExampleIndex On archetypes(ELEMENTS)
}
- ehrId: con el registro de información clínica electrónica del paciente.
- compositionUid: el identificador de la composición.
- compositionType: con el tipo de composición almacenada.
- startTime: con la fecha de creación de la composición.
- archetypes: con la lista de arquetipos presentes en la composición.
- doc: con el formato JSON del documento.
- deleted: valor boleano para las eliminaciones "soft" que no implican el borrado total.
Usaremos índices para mejorar el rendimiento de las consultas.
Soporte AQL
Como dijimos antes, AQL es un lenguaje de consulta basado en rutas. ¿Cómo podríamos emular el mismo comportamiento en IRIS for Health? ¡Bienvenido a JSON_TABLE!
¿Qué son las JSON_TABLE?
La función JSON_TABLE devuelve una tabla que puede usarse en una consulta SQL mediante la asignación de valores JSON a columnas. Las asignaciones de un valor JSON a una columna se escriben como expresiones del lenguaje de rutas SQL/JSON.
Como función con valores de tabla, JSON_TABLE devuelve una tabla que puede usarse en la cláusula FROM de una instrucción SELECT para acceder a los datos almacenados en un valor JSON; esta tabla no persiste entre consultas. Se pueden realizar varias llamadas a JSON_TABLE dentro de una misma cláusula FROM y pueden aparecer junto con otras funciones con valores de tabla.
Hemos implementado un método de clase en Python para traducir el AQL a SQL, pero existe un problema: el AQL se basa en rutas relativas de los arquetipos, no en rutas absolutas. Por lo tanto, necesitamos identificar la ruta absoluta de cada arquetipo y vincularla con la ruta relativa del AQL.
¿Cómo podemos saber la ruta absoluta? ¡Muy fácil! La encontramos cuando el usuario guarda el archivo OPT2 de la composición en IRIS. En cuanto obtenemos la ruta absoluta, la guardamos en un archivo CSV específico para la composición (se guardaría de forma global o de cualquier otra forma). De esta manera, solo tenemos que obtener la ruta absoluta del archivo de composición específico o, si el AQL no define la composición, buscar en los archivos CSV disponibles la ruta absoluta de los arquetipos del AQL.
Veamos cómo funciona. Aquí hay un ejemplo de AQL para obtener todos los diagnósticos con un código CIE-10 específico:
SELECT
  c/uid/value AS comp_uid,
  c/context/start_time/value AS comp_start_time,
  dx/data[at0001]/items[at0002]/value/value AS diagnosis_text,
  dx/data[at0001]/items[at0003]/value/defining_code/code_string AS diagnosis_code
FROM EHR e
CONTAINS COMPOSITION c[openEHR-EHR-COMPOSITION.diagnostic_summary.v1]
CONTAINS SECTION s[openEHR-EHR-SECTION.diagnoses_and_treatments.v1]
CONTAINS EVALUATION dx[openEHR-EHR-EVALUATION.problem_diagnosis.v1]
WHERE dx/data[at0001]/items[at0003]/value/defining_code/code_string
      MATCHES {'E11', 'I48.0'}
ORDER BY c/context/start_time/value DESC
La función Transform de la clase OPENEHR.Utils.AuxiliaryFunctions transformará el AQL a lo siguiente:
SELECT comp_uid, comp_start_time, diagnosis_text, diagnosis_code
FROM (
    SELECT c.compositionUid AS comp_uid,
        jt_root.comp_start_time AS comp_start_time,
        jt_n1.diagnosis_text AS diagnosis_text,
        jt_n1.diagnosis_code AS diagnosis_code
    FROM OPENEHR_Object.Composition AS c,
        JSON_TABLE( c.doc, '$' COLUMNS ( comp_start_time VARCHAR(4000) PATH
            '$.context.start_time.value' ) ) AS jt_root,
        JSON_TABLE( c.doc, '$.content[*]?(@._type=="SECTION" && @.archetype_node_id==
            "openEHR-EHR-SECTION.diagnoses_and_treatments.v1").items[*]?
            (@._type=="EVALUATION" && @.archetype_node_id=="openEHR-EHR-EVALUATION.problem_diagnosis.v1")'
            COLUMNS (
                diagnosis_text VARCHAR(4000) PATH '$.data[*]?(@.archetype_node_id=="at0001").items[*]?
                    (@.archetype_node_id=="at0002").value.value',
                diagnosis_code VARCHAR(255) PATH '$.data[*]?(@.archetype_node_id=="at0001").items[*]?
                    (@.archetype_node_id=="at0003").value.defining_code.code_string' ) ) AS jt_n1
    WHERE ('openEHR-EHR-COMPOSITION.diagnostic_summary.v1' %INLIST (c.archetypes)
        AND 'openEHR-EHR-EVALUATION.problem_diagnosis.v1' %INLIST (c.archetypes))
        AND (jt_n1.diagnosis_code LIKE '%E11%' OR jt_n1.diagnosis_code LIKE '%I48.0%') ) U
ORDER BY comp_start_time DESC
Probemos nuestra API REST con un AQL:
.png)
¡Bingo!
Y ahora una AQL incluyendo condiciones numéricas:
SELECT
  c/uid/value AS comp_uid,
  c/context/start_time/value AS comp_start_time,
  a/items[at0024]/value/magnitude AS creatinine_value,
  a/items[at0024]/value/units AS creatinine_units
FROM EHR e
CONTAINS COMPOSITION c[openEHR-EHR-COMPOSITION.lab_results_and_medications.v1]
CONTAINS OBSERVATION o[openEHR-EHR-OBSERVATION.laboratory_test_result.v1]
CONTAINS CLUSTER a[openEHR-EHR-CLUSTER.laboratory_test_analyte.v1]
WHERE a/items[at0001]/value/value = 'Creatinina (mg/dL)'
  AND a/items[at0024]/value/magnitude BETWEEN 1.2 AND 1.8
ORDER BY c/context/start_time/value DESC
Se transforma en:
SELECT comp_uid, comp_start_time, ldl_value, ldl_units
FROM (
    SELECT c.compositionUid AS comp_uid, jt_root.comp_start_time AS comp_start_time,
        jt_n1.ldl_value AS ldl_value, jt_n1.ldl_units AS ldl_units
    FROM OPENEHR_Object.Composition AS c,
        JSON_TABLE( c.doc, '$' COLUMNS ( comp_start_time VARCHAR(4000)
            PATH '$.context.start_time.value' ) ) AS jt_root,
        JSON_TABLE( c.doc, '$.content[*]?(@._type=="OBSERVATION" &&
            @.archetype_node_id=="openEHR-EHR-OBSERVATION.laboratory_test_result.v1")
                .data.events[*]?(@._type=="POINT_EVENT").data.items[*]?(@._type=="CLUSTER" &&
                @.archetype_node_id=="openEHR-EHR-CLUSTER.laboratory_test_analyte.v1")'
                COLUMNS (
                    ldl_value NUMERIC PATH '$.items[*]?
                        (@.archetype_node_id=="at0024").value.magnitude',
                    ldl_units VARCHAR(64) PATH '$.items[*]?
                        (@.archetype_node_id=="at0024").value.units',
                    _w1 VARCHAR(4000) PATH '$.items[*]?
                        (@.archetype_node_id=="at0001").value.value' ) ) AS jt_n1
    WHERE ('openEHR-EHR-COMPOSITION.lab_results_and_medications.v1' %INLIST (c.archetypes)
        AND 'openEHR-EHR-OBSERVATION.laboratory_test_result.v1' %INLIST (c.archetypes)
        AND 'openEHR-EHR-CLUSTER.laboratory_test_analyte.v1' %INLIST (c.archetypes))
        AND jt_n1._w1 = 'LDL (mg/dL)' AND jt_n1.ldl_value <= 130 )
    U ORDER BY comp_start_time DESC
.png)
¡Otro éxito absoluto!
Conclusiones
Como puede ver en este ejemplo, InterSystems IRIS for Health le proporciona todas las herramientas necesarias para implementar un repositorio openEHR. Si tiene alguna pregunta, ¡no dude en dejar un comentario!
Descargo de responsabilidad
El código asociado es solo una prueba de concepto. No pretende implementar un repositorio con todas las funcionalidades, sino demostrar que es perfectamente posible con InterSystems IRIS for Health. ¡Disfrútalo!


.png)
.png)
 Open Exchange


