検索

ディスカッション (1)1
続けるにはログインするか新規登録を行ってください
記事
· 2024年2月14日 4m read

Data Tagging in IRIS Using Embedded Python and the OpenAI API

The invention and popularization of Large Language Models (such as OpenAI's GPT-4) has launched a wave of innovative solutions that can leverage large volumes of unstructured data that was impractical or even impossible to process manually until recently. Such applications may include data retrieval (see Don Woodlock's ML301 course for a great intro to Retrieval Augmented Generation), sentiment analysis, and even fully-autonomous AI agents, just to name a few!

In this article, I want to demonstrate how the Embedded Python feature of IRIS can be used to directly interface with the Python OpenAI library, by building a simple data tagging application that will automatically assign keywords to the records we insert into an IRIS table. These keywords can then be used to search and categorize the data, as well as for data analytics purposes. I will use customer reviews of products as an example use case.

Prerequisites

  • A running instance of IRIS
  • An OpenAPI API key (which you can create here)
  • A configured development environment (I will be using VS Code for this article)

The Review Class

Let us start by creating an ObjectScript class that will define the data model for our customer reviews. To keep things simple, we will only define 4 %String fields: the customer's name, the product name, the body of the review, and the keywords we will generate. The class should extend %Persistent so that we can save its objects to disk.

Class DataTagging.Review Extends %Persistent
{
Property Name As %String(MAXLEN = 50) [ Required ];
Property Product As %String(MAXLEN = 50) [ Required ];
Property ReviewBody As %String(MAXLEN = 300) [ Required ];
Property Keywords As %String(MAXLEN = 300) [ SqlComputed, SqlComputeOnChange = ReviewBody ];
}

Since we want the Keywords property to be automatically computed on insert or update to the ReviewBody property, I am marking it as SqlComputed. You can learn more about computed values here.

The KeywordsComputation Method

We now want to define a method that will be used to compute the keywords based on the review body. We can use Embedded Python to interact directly with the official openai Python package. But first, we need to install it. To do so, run the following shell command:

<your-IRIS-installation-path>/bin/irispip install --target <your-IRIS-installation-path>/Mgr/python openai

We can now use OpenAI's chat completion API to generate the keywords:

ClassMethod KeywordsComputation(cols As %Library.PropertyHelper) As %String [ Language = python ]
{
    '''
    This method is used to compute the value of the Keywords property
    by calling the OpenAI API to generate a list of keywords based on the review body.
    '''
    from openai import OpenAI

    client = OpenAI(
        # Defaults to os.environ.get("OPENAI_API_KEY")
        api_key="<your-api-key>",
    )

    # Set the prompt; use few-shot learning to give examples of the desired output
    user_prompt = "Generate a list of keywords that summarize the content of a customer review of a product. " \
                + "Output a JSON array of strings.\n\n" \
                + "Excellent watch. I got the blue version and love the color. The battery life could've been better though.\n\nKeywords:\n" \
                + "[\"Color\", \"Battery\"]\n\n" \
                + "Ordered the shoes. The delivery was quick and the quality of the material is terrific!.\n\nKeywords:\n" \
                + "[\"Delivery\", \"Quality\", \"Material\"]\n\n" \
                + cols.getfield("ReviewBody") + "\n\nKeywords:"
    # Call the OpenAI API to generate the keywords
    chat_completion = client.chat.completions.create(
        model="gpt-4",  # Change this to use a different model
        messages=[
            {
                "role": "user",
                "content": user_prompt
            }
        ],
        temperature=0.5,  # Controls how "creative" the model is
        max_tokens=1024,  # Controls the maximum number of tokens to generate
    )

    # Return the array of keywords as a JSON string
    return chat_completion.choices[0].message.content
}

Notice how in the prompt, I first specify the general instructions of how I want GPT-4 to "generate a list of keywords that summarize the content of a customer review of a product," and then I give two example inputs along with the desired outputs. I then insert cols.getfield("ReviewBody") and end the prompt with the word "Keywords:", nudging it to complete the sentence by providing the keywords in the same format as the examples I gave it. This is a simple example of the Few-Shot Prompting technique.

I chose to store the keywords as a JSON string for the sake of simplicity of presentation; a better way to store them in production could be a DynamicArray, but I will leave this as an exercise to the reader.

Generating Keywords

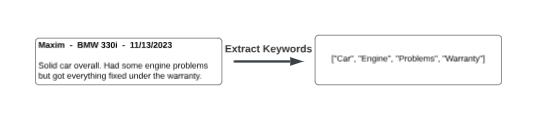
We can now test our data tagging application by inserting a row into our table using the following SQL query through the Management Portal:

INSERT INTO DataTagging.Review (Name, Product, ReviewBody)
VALUES ('Ivan', 'BMW 330i', 'Solid car overall. Had some engine problems but got everything fixed under the warranty.')

As you can see below, it automatically generated four keywords for us. Well done!

Conclusions

To summarize, the ability of InterSystems IRIS to embed Python code allows for a large range of possibilities when dealing with unstructured data. Leveraging the power of OpenAI for automated data tagging is just one example of what one can achieve with this powerful feature. This leads to fewer human errors and higher efficiency overall.

4 Comments
ディスカッション (4)3
続けるにはログインするか新規登録を行ってください
記事
· 2024年2月12日 3m read

Application Metrics for HealthShare

One of the great features in InterSystems IRIS is Monitoring InterSystems IRIS using REST API.  This enables every InterSystems HealthShare instance with the ability to use a REST interface to provide statistics about the InterSystems HealthShare instance.  This feature includes information about the InterSystems IRIS instance with many out of the box statistics and metrics.

You also have the ability to create application level statistics and metrics.

User Story:  As a large organization, we want to know how many people (patients or members) and how many documents we are managing in our HealthShare solution to help us understand our population being served.

Note: This example was done in InterSystems HealthShare 2023.1.

First, in the InterSystems HealthShare HSREGISTRY namespace, we are going to create a class (HS.Local.HSREGISTRY.HSMetrics.cls) to capture the information for the new application metric.

Code for the class:

Class HS.Local.HSREGISTRY.HSMetrics Extends %SYS.Monitor.SAM.Abstract
{
Parameter PRODUCT = "myHS";

/// Collect counts for Patients and Documents
Method GetSensors() As %Status
    {
                &sql(SELECT COUNT(*) INTO :tPatCount FROM HS_Registry.Patient)
                do ..SetSensor("HSPatientCount",tPatCount,"HSREGISTRY")
                &sql(SELECT COUNT(*) INTO :tDocCount FROM HS_Registry.Document)
                do ..SetSensor("HSDocumentCount",tDocCount,"HSREGISTRY")
               
                return $$$OK
      }
}

The important features of this class include:

  • The name of the class begins with “HS.Local”, which is mapped to the HSCUSTOM namespace and contains custom code.  This code will not get overwritten during upgrades.
  • The name of the class includes “HSREGISTRY”, this let’s us identify which namespace we are gathering these statistics. In the future, we can gather statistics in other namespaces and this naming convention allows us to differentiate and know where this is collection is run.
  • This class inherits from “%SYS.Montior.SAM.Abstract”, which it needs to work with the existing REST API.
  • There is a product name defined as “myHS”, this could be your company name or a line of business or anything you would like to differentiate these statistics.  This product name will appear as a prefix in the REST API output of this new metric.
  • The method “GetSensors()” is used to collect the statistics.
  • We use SQL to get the counts of the data.  It is important to understand how long particular SQL statements takes to run as it will affect performance of the returned API.
  • When we call “SetSensor()” we are calling with the parameters:
    • Name of the metric
    • The value of the metric
    • An identifier (in this case, the namespace so we know where we got the data) of this metric.


After we have saved and compiled this class, we need to include our new class into the /metrics configuration.

From a terminal session on the InterSystems HealthShare instance with HSREGISTRY namespace:

  • USER> zn “%SYS”
  • %SYS> write ##class(SYS.Monitor.SAM.Config).AddApplicationClass("HS.Local.HSREGISTRY.HSMetrics", "HSREGISTRY")

These commands tell us to run the class we created in the HSREGISTRY namespace when we call the REST API.

Next, we must ensure that web application /api/monitor will have access to both the code and the data.

We need to add the following application roles to the web application:

  • %DB_HSCUSTOM (to read the class)
  • %DB_HSREGISTRY (to read the data)

Screen Shot from System Management Portal:

Now, when you call the REST API (http://<baseURL>/api/monitor/metrics), you will see your metrics:

I hope this helps inspire you to create your own application metrics within InterSystems HealthShare using this exciting InterSystems IRIS feature.

2 Comments
ディスカッション (2)2
続けるにはログインするか新規登録を行ってください
記事
· 2024年2月9日 6m read

Continuous Delivery of your InterSystems solution using GitLab - Part XII: Dynamic Inactivity Timeouts

Welcome to the next chapter of my CI/CD series, where we discuss possible approaches toward software development with InterSystems technologies and GitLab.
Today, we continue talking about Interoperability, specifically monitoring your Interoperability deployments. If you haven't yet, set up Alerting for all your Interoperability productions to get alerts about errors and production state in general.

Inactivity Timeout is a setting common to all Interoperability Business Hosts. A business host has an Inactive status after it has not received any messages within the number of seconds specified by the Inactivity Timeout field. The production Monitor Service periodically reviews the status of business services and business operations within the production and marks the item as Inactive if it has not done anything within the Inactivity Timeout period.
The default value is 0 (zero). If this setting is 0, the business host will never be marked Inactive, no matter how long it stands idle.

1 Comment
ディスカッション (1)1
続けるにはログインするか新規登録を行ってください
質問
· 2024年2月8日

help with TLS on 2016 version

Hi,

I am trying to connect to another server using  %Net.HttpRequest.

I keep getting this error  : SSL23_GET_SERVER_HELLO:unsupported protocol.

My guess is that the site I am reaching for uses TLS1.3 which is not supported in 2016, But I cant right now ask my client to upgrade.

Is it possible to override this ? install some kind of a patch or a more recent version of openssl on the server ?

Thanks

Amiram

2 Comments
ディスカッション (2)3
続けるにはログインするか新規登録を行ってください