検索

記事
· 2024年3月3日 5m read

How to send messages to Microsoft Teams

Hi community,

The aim of this article is to explain how to create messaging between IRIS and Microsoft Teams.

In my company, we wanted to monitor error messages, and we used the Ens.Alert class to redirect those error messages through a Business Operation that sent an email.
The problem was that we sent those error messages to a support account where there were many emails. We wanted something specific for a specific team.

So we investigated how to make these messages reach the development team directly and they could have, in real time, a notification of an error in our production.
In our company we use Microsoft Teams as a corporate tool, so we asked ourselves: How could we make these messages reach the IRIS development team?

Previous steps

Please, expand to know how to configure your teams with the app Incoming Webhook.

 
Previous steps

Note: Webhook link is divided in two parts. Server and URL, remember this when you going to configure the component.

https://YOURCOMPANY.webhook.office.com/webhookb2/40cc6704-1bc5-4f87-xxxx-xxxxxxxxf@5xxxxxa-643b-47a3-xxxxx-fc962cc7cdb2/IncomingWebhook/6f272d796f1844b8b0b57b61365f8961/2ff46079-ee4a-442b-a642-dc418f6c67ee
Server: YOURCOMPANY.webhook.office.com
URL: /webhookb2/40cc6704-1bc5-4f87-xxxx-xxxxxxxxf@5xxxxxa-643b-47a3-xxxxx-fc962cc7cdb2/IncomingWebhook/6f272d796f1844b8b0b57b61365f8961/2ff46079-ee4a-442b-a642-dc418f6c67ee

Calling to webhook API

The Incoming Webhook app admits the Office 360 connector cards. You can create your card using the adaptivecard designer.

So, I've designed a card to display a error message (Ens.AlertRequest).

 
AdaptiveCard for Ens.AlertRequest

Using this schema, You can create the message using the messages of St.Teams like this

set class=##class(St.Teams.Msg.Adaptive.Request).%New()
set class.Type = "message"
set attach = ##class(St.Teams.Msg.Adaptive.Attachment).%New()
set content = ##class(St.Teams.Msg.Adaptive.Content).%New()

set container = ##class(St.Teams.Msg.Common.Item).%New()
set container.Type = "Container"
set item1=##class(St.Teams.Msg.Common.Item).%New()
set item1.Type = "TextBlock"
set item1.Text = "Unhandled error"
set item1.Weight = "bolder"
set item1.Size = "Medium"
set item2=##class(St.Teams.Msg.Common.Item).%New()
set item2.Type = "TextBlock"
set item2.Text = "St.Teams.BO.MainProcess"
set item2.Weight = "bolder"
set item2.Size = "small"
set item2.IsSubtitle = 1
set item3=##class(St.Teams.Msg.Common.Item).%New()
set item3.Type = "TextBlock"
set item3.Text = "ERROR <Ens>ErrFTPListFailed: 'Unable to open data connection to 127.0.0. on port 8080',código=425)"
set item3.Wrap = 1
set factSet=##class(St.Teams.Msg.Common.Item).%New()
set factSet.Type = "FactSet"
set factItem1 =##class(St.Teams.Msg.Common.FactItem).%New()
set factItem1.Title = "SessionId"
set factItem1.Value = "111"
set factItem2 =##class(St.Teams.Msg.Common.FactItem).%New()
set factItem2.Title = "Time"
set factItem2.Value = "2024-02-28 11:00:15"
do factSet.Facts.Insert(factItem1)
do factSet.Facts.Insert(factItem2)

do container.Items.Insert(item1)
do container.Items.Insert(item2)
do container.Items.Insert(item3)
do container.Items.Insert(factSet)

do content.Body.Insert(container)
set attach.Content = content
do class.Attachments.Insert(attach)

it creates the Json to call to the Webhook. But we want to create the message from a Ens.AlertRequest message, the best way is using a Data Transformer.

Then, the rule of your Ens.Alert should be like this:

It transform the Ens.AlertRequest using the St.Teams.DT.EnsAlertToAdpativeRequest and send it to St.Teams.BO.Api.Teams.

Then you recive the message directly into your Teams group.

I hope it is as useful to you as it has been to us.

15 Comments
ディスカッション (15)4
続けるにはログインするか新規登録を行ってください
記事
· 2024年3月2日 4m read

IKO - Lessons Learned (Part 1 - Helm)

The IKO documentation is robust. A single web page, that consists of about 50 actual pages of documentation. For beginners that can be a bit overwhelming. As the saying goes: how do you eat an elephant? One bite at a time. Let's start with the first bite: helm.

What is Helm?

Helm is to Kubernetes what the InterSystems Package Manager (IPM, formerly ObjectScript Package Manager - ZPM) is to IRIS.

It facilitates the installation of applications on the platform - in a fashion suitable for Kubernetes. That's to say that it is developed in such a way to facilitate installation to your needs, whether it be a development, test, or production environment.

We provide on our WRC software distribution all you will need under the IRIS Components tab - it consists of a .tar.gz. Extract it and you will get a .tar. Extract it again and you will see a folder iris_operator_<yourversion>. In here are a README with instructions, as well as 3 folders - an image of the IKO (you could have also got this from the InterSystems Container Registry), chart, and samples. Samples is just to help you form your files but is not actually necessary for IKO installation. Chart, however, is necessary. Let's take a peek.

chart
|
|-> iris-operator
               |
               | -> README.md
               | -> .helmignore
               | -> Chart.yaml
               | -> values.yaml
               | -> templates 
                      | -> _helpers.tpl
                      | -> apiregistration.yaml
                      | -> appcatalog-user-roles.yaml
                      | -> cleaner.yaml
                      | -> cluster-role.yaml
                      | -> cluster-role-binding.yaml
                      | -> deployment.yaml
                      | -> mutating-webhook.yaml
                      | -> NOTES.txt
                      | -> service.yaml
                      | -> service-account.yaml
                      | -> user-roles.yaml
                      | -> validating-webhook.yaml


This is the meat and potatoes (a funny way to say basic ingredients) of the application we will be installing. Don't worry. The only thing that we care about is going to be the values.yaml. Everything else is going on behind the scenes, thanks to Helm. Phew! But it's important to know that though our operator may seem like an ordinary pod, it is a lot more than that.

Most of the contents of the values.yaml are also going to be out of the scope of this article because you will not have to worry about them. We will care about just 4 fields (okay, 5 at most).

They are operator.registry, operator.repository, operator.tag, imagePullSecrets.name[0], and imagePullPolicy.

Where is your IKO image? Is your organization using a private repository? Are you planning on pulling from the ICR? Specify your image details in the registry, repository, and tag fields. If you are using the ICR you can leave it as is.

How will you access the ICR, or your organization repository? Assuming it is private you will need to specify your details with which you can access it for pulling. In the next article I touch on how to create this secret, which we can call intersystems-pull-secret instead of the standard dockerhub-secret which is what is presently there if you downloaded the files from the WRC.

Finally for the imagePullPolicy we can leave it as Always, or alternatively change it to IfNotPresent or Never. I'll refer you to the Kubernetes documentation if you need clarification - here. I tend to use IfNotPresent.

Looks like we're good to go (assuming you already have helm installed, if not install it first)! Let's install the IKO. We are going to need to tell helm where the folder with all our goodies is (that's the iris-operator folder you see above). If we were to be sitting at the chart directory you can use the command

helm install intersystems iris-operator

but perhaps you're sitting a little higher. No problem. This is fine too assuming you are sitting in a repository with iris_operator_amd-3.6.7.100:

helm install intersystems iris_operator_amd-3.6.7.100/chart/iris-operator

You'll get a message that the installation was a success and you can double check your deployment is running as is noted by the message and in our docs.

kubectl --namespace=default get deployments -l "release=intersystems, app=iris-operator"

In the next post we'll put the InterSystems Kubernetes Operator to use.

2 Comments
ディスカッション (2)2
続けるにはログインするか新規登録を行ってください
質問
· 2024年3月1日

POST request with paging FHIR bundle

Hi everyone,

I'm looking for a strategy for dividing a large FHIR message, in a post request, into smaller parts. 

I have found the paging modifier for the GET request, but not a similiar one for the POST request. Maybe the 'batch' type of a Bundle could help me to indicate this aim but there aren't any attribute to say the total or the i-th element. 

Do you know of any method for implementing 'paging' in a post request?

2 Comments
ディスカッション (2)2
続けるにはログインするか新規登録を行ってください
記事
· 2024年2月29日 5m read

インデックス再構築が終わるまで新しく定義したインデックスを使用させない方法

これは InterSystems FAQ サイトの記事です。

新しいインデックスを定義した後、インデックスの再構築が完了する前にクエリを実行するとデータが存在しているにもかかわらず「検索結果0件」や検索結果数が徐々に増えるような状況が発生します。

インデックスを永続クラス定義(またはテーブル定義)に追加しコンパイルすることで今まで使用していたクエリ実行経路が削除され、再度同じクエリを実行するタイミングで新しいインデックス定義を含めた実行経路が作成されるためです。(この時にインデックス再構築が完了していないとインデックスデータが存在しない、または不完全であるため0件や徐々に検索結果数が増えるような状況を起こします。)

これを起こさなために、新しいインデックスの再構築が終了するまでクエリオプティマイザにインデックスを使用させないように指定する方法が用意されています。

※ 2024/8/2: 2024.1以降から利用できる方法を追加しました。


2024.1以降

CREATE INDEXのDEFERオプションを使用します(オプションを付けないCREATE INDEX文では、作成時にインデックスの再構築も同時に行われます)。

DEFERオプションを使用することで、インデックスは追加されますがインデックスの再構築は行われず、追加したインデックスはクエリオプティマイザが使用しないように「選択不可」に設定されます。

再構築が行えるタイミングで BUILD INDEX文を利用することで、再構築が終了すると同時に追加したインデックスが「選択可能」に自動的に設定されます。

なお、追加したインデックスの選択可/不可は管理ポータルのSQL画面で確認できます(管理ポータル > [SQL] > ネームスペース選択 > テーブル選択 > (画面右)カタログの詳細 > [マップ/インデックス]をチェック)。

※インデックスの「選択可能」「選択不可」は、以降でご紹介するSetMapSelectability()メソッドを利用しても変更できます。

※永続クラス定義を利用している場合、デフォルトではDDLの発行が無効化されています。クラス定義文に DdlAllowed属性 を追加することでDDL文の発行ができます(設定後、クラス定義をコンパイルする必要があります)。


以下定義を行った場合は、管理ポータルでは図のように見えます。

CREATE INDEX NameIdx On Sample.Person (Name) DEFER
CREATE INDEX PrefIdx On Sample.Person (Pref)


インデックス追加から再構築までの手順は以下の通りです。

1) 永続クラス定義の場合、DdlAllowed属性を設定します。

Class Sample.Person Extends %Persistent [ DdlAllowed ]


2) CREATE INDEXのDEFERオプションを付けてインデックス定義を追加します。

CREATE INDEX NameIdx On Sample.Person (Name) DEFER


3) 再構築ができるタイミングで、BUILD INDEXを実行します。

BUILD INDEX FOR TABLE Sample.Person INDEX NameIdx


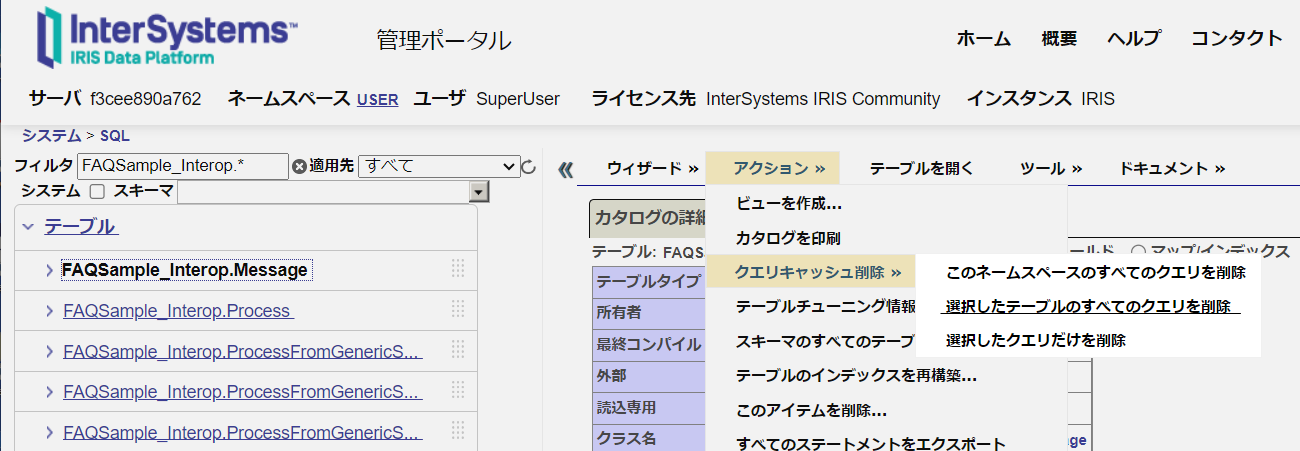
4) BUILD INDEXが終了したら、追加したインデックスで影響を受けそうなクエリキャッシュを破棄します。

管理ポータルでクエリキャッシュを削除するには、管理ポータル > [システムエクスプローラ] > [SQL] > (対象ネームスペースに切り替えた後) > [アクション] > [クエリキャッシュ削除]

プログラムからキャッシュを破棄する場合は、「プログラムでクエリキャッシュを削除する方法」をご参照ください。


2023.1以前

2022.1以降では、$SYSTEM.SQL.Util.SetMapSelectability()を使用します。

※インデックスの再構築が完了したら、必ず指定を元に戻してください。

(2021.1以前では、$SYSTEM.SQL.SetMapSelectability()を使用します。引数の指定方法は2022.1以降と同様です。)


SetMapSelectability()メソッドは%Statusの戻り値が設定されています。
ステータスOKの場合は1が戻ります。エラーステータスの場合は以下のメソッドを使用してエラー内容を確認してください。

write $SYSTEM.Status.GetErrorText(ステータスが入った変数)

ご参考:%Statusのエラーが返ってきたら


以下、Training.Employeeに新インデックス:NewIndexを定義する例でご紹介します。

1) 定義予定の新インデックス名をクエリオプティマイザが使用しないように設定します。

set status=$SYSTEM.SQL.Util.SetMapSelectability("Training.Employee","NewIndex",0)
  • 第1引数:クラス名
  • 第2引数:インデックス名(これから指定する新インデックス名を指定します。)
  • 第3引数:隠す場合は0、見せる場合は1

2) インデックスを追加します。

  • 永続クラスの場合はインデックスを追加しコンパイルし、インデックス再構築を実行します。
  • SQL文で実行する場合はCREATE INDEXを実行した後インデックス再構築が自動的に開始されます。

3) クエリオプティマイザにインデックスを見せるように変更します。

 ※インデックスの再構築が終了してから行います。

$system.SQL.Util.SetMapSelectability("Training.Employee","NewIndex",1)

4) クエリキャッシュを削除します。

方法詳細は、2024.1以降の手順でご紹介した図解をご参照ください。


関連項目として、インデックスの再構築を複数のプロセスで行う方法もあります。
詳細は:「アプリケーション使用中にインデックス再構築を複数プロセスで実行する方法」をご覧ください。 

《注意》CREATE INDEX文でインデックスを追加した場合、インデックス追加後すぐに再構築が開始されますが、インデックスをクラス定義文で追加した場合インデックス再構築は実行を命令するまで開始されません。

1 Comment
ディスカッション (1)1
続けるにはログインするか新規登録を行ってください
お知らせ
· 2024年2月29日

Reminder: Exam Design Feedback for InterSystems IRIS Developer Professional Exam Closes March 8

Hi All,

On February 8, 2024, we asked for input from the IRIS community regarding exam topics for our InterSystems IRIS Developer Professional exam. We will close the window for providing feedback on the exam topics on Friday, March 8, 2024. If you would like to have your say in what topics are covered on the exam, this is your last chance!

How can I access the survey? You can access it here

  • Survey does not work well on mobile devices - you can access it, but it will involve a lot of scrolling
  • Survey can be resumable if you return to it on the same device in the same browser - answers save with the Save/Next button
  • Survey will close on March 8, 2024

InterSystems IRIS Developer Professional

back-end software developer who:

  • writes and executes efficient, scalable, maintainable, and secure code on (or adjacent to) InterSystems IRIS using best practices for the development lifecycle,
  • effectively communicates development needs to systems and operations teams (e.g., database architecture strategy),
  • integrates InterSystems IRIS with modern development practices and patterns, and
  • is familiar with the different data models and modes of access for InterSystems IRIS (ObjectScript, Python, SQL, JDBC/ODBC, REST, language gateways, etc.).

At least 2 years of experience developing with InterSystems IRIS is recommended. Any code samples that include InterSystems IRIS classes will have methods displayed in both ObjectScript and Python (or SQL). 

ディスカッション (0)1
続けるにはログインするか新規登録を行ってください