
 Open Exchange
Como todos sabemos, a InterSystems é uma ótima empresa.
Seus produtos podem ser tão úteis quanto complexos.
No entanto, nosso orgulho às vezes nos impede de admitir que talvez não entendamos alguns conceitos ou produtos que a InterSystems nos oferece.
Hoje estamos começando uma série de artigos explicando como alguns dos intrincados produtos da InterSystems funcionam, obviamente de forma simples e clara.
Neste ensaio, irei esclarecer o que é Machine Learning e como tirar proveito dele... porque desta vez, VOCÊ VAI SABER com certeza do que estou falando.
O que (diabos) é Machine Learning?
Machine Learning é um ramo da inteligência artificial que se concentra no desenvolvimento de algoritmos e modelos que permitem aos computadores aprender a realizar tarefas específicas com base em dados, sem serem explicitamente programados para cada tarefa. Em vez de seguir instruções específicas, as máquinas aprendem por meio da experiência, identificando padrões em dados e fazendo previsões ou tomando decisões com base neles.
O processo envolve alimentar algoritmos com conjuntos de dados (chamados conjuntos de treinamento) para fazê-los aprender e melhorar seu desempenho ao longo do tempo. Esses algoritmos podem ser projetados para realizar uma ampla gama de tarefas, incluindo reconhecimento de imagem, processamento de linguagem natural, previsão de tendências financeiras, diagnóstico médico e muito mais.
Em resumo, Machine Learning permite que os computadores aprendam com dados e melhorem com a experiência, possibilitando que realizem tarefas complexas sem programação explícita para cada situação de forma autônoma...
É uma definição encantadora. No entanto, imagino que você precise de um exemplo, então aqui vai:
Bem, imagine que todos os dias você anota em algum lugar a hora do nascer e do pôr do sol. Se alguém lhe perguntasse se o sol nasceria no dia seguinte, o que você diria? Tudo o que você notou foi apenas a hora do nascer e do pôr do sol...
Observando seus dados, você concluiria que, com 100% de probabilidade, o sol nascerá amanhã. No entanto, você não pode ignorar o fato de que existe uma chance de que, devido a uma catástrofe natural, você não consiga ver o sol nascendo no dia seguinte. É por isso que você deveria dizer que a probabilidade de testemunhar um nascer do sol no dia seguinte é, na verdade, de 99,99%.
Considerando sua experiência pessoal, você pode fornecer uma resposta que corresponda aos seus dados. Machine Learning é a mesma coisa, só que feita por um computador.
Observe a tabela abaixo:
| A | B |
| 1 | 2 |
| 2 | 4 |
| 3 | 6 |
| 4 | 8 |
Como as colunas A e B se relacionam?
A resposta é fácil, o valor de B é o dobro de A. B=A*2, é um padrão.
Agora, examine a outra tabela:
| A | B |
| 1 | 5 |
| 2 | 7 |
| 3 | 9 |
| 4 | 11 |
Esta é um pouco mais complicada... Se você ainda não descobriu o padrão, é B=(A*2) +3.
Um humano, por exemplo, consegue deduzir a fórmula, o que significa que quanto mais dados você tem, mais fácil é adivinhar o padrão por trás desse mistério.
Então, Machine Learning usa a mesma lógica para revelar o padrão oculto nos dados.
Como começar?
Primeiro, você precisará de um computador. Sim, já que este artigo é sobre Machine Learning, ter apenas um caderno e um lápis não será suficiente.
Segundo, você precisará de uma instância do IRIS Community. Você pode baixar uma imagem Docker e executar seu teste aqui. Observe que ele deve ter ML integrado, por exemplo, a versão mais recente do InterSystems IRIS Community:
docker pull intersystems/iris-ml-community:latest-emou
docker pull intersystems/iris-community:latestSe você precisar de outra plataforma, verifique https://hub.docker.com/r/intersystems/iris-ml-community/tags ou https://hub.docker.com/r/intersystems/iris-community/tags.
Então, crie um container a partir desta imagem e execute-o:
docker run --name iris-ml -d --publish 1972:1972 --publish 52773:52773 intersystems/iris-m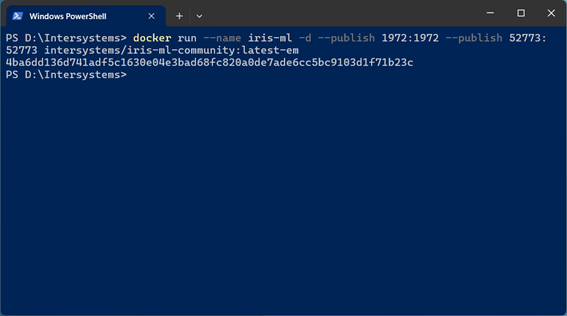
Se você é da "velha guarda", pode baixar uma versão gratuita para avaliação. No entanto, é importante ter uma conta InterSystems. Confira em https://login.intersystems.com/login/SSO.UI.Register.cls.
Depois, solicite uma cópia de avaliação em https://evaluation.intersystems.com/Eval/.
Instale e execute sua instância.
Agora, acesse o portal IRIS:http://localhost:52773/csp/user/EnsPortal.ProductionConfig.zen
- Usuário: Superuser
- Senha: SYS
Observação: Você pode ser solicitado a alterar a senha na primeira vez. Não se preocupe, apenas crie uma senha que você possa lembrar facilmente.
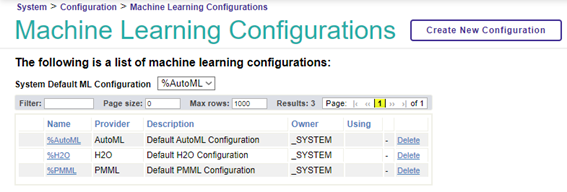
Abra a "Machine learning configuration" para revisar as versões que você instalou.
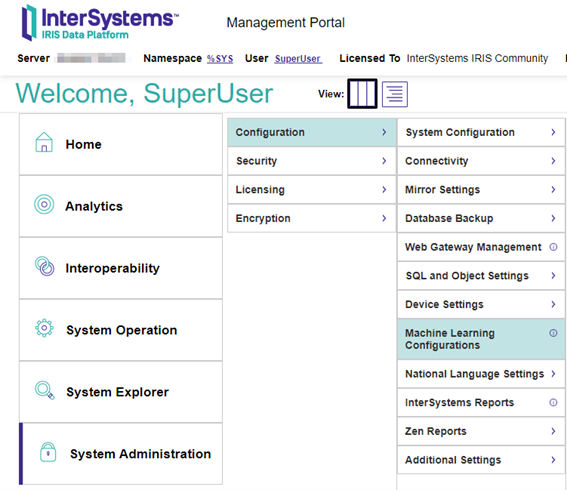
Neste ponto, você pode ver as configurações de provedor de ML instaladas.
Terra, "água" e fogo... qual o melhor?
Todos são bons. O importante é como treinar seu dragão, quer dizer... seus dados.
Explore mais informações sobre os modelos existentes:
AutoML: AutoML é um sistema de Machine Learning automatizado desenvolvido pela InterSystems e hospedado dentro da plataforma de dados InterSystems IRIS®. Ele é projetado para construir modelos preditivos precisos rapidamente usando seus dados. Ele automatiza vários componentes chave do processo de aprendizado de máquina.
Clique no link abaixo para ver mais informações: https://docs.intersystems.com/iris20241/csp/docbook/Doc.View.cls?KEY=GAUTOML_Intro
H2O: É um modelo de Machine Learning de código aberto. O provedor H2O não oferece suporte à criação de modelos de séries temporais.
Siga o link abaixo para descobrir mais: https://docs.intersystems.com/irislatest/csp/docbook/DocBook.UI.Page.cls?KEY=GIML_Configuration_Providers#GIML_Configuration_Providers_H2O
PMML: (Predictive Modelling Markup Language). É um padrão baseado em XML que expressa modelos analíticos. Ele oferece uma maneira para que aplicativos definam modelos estatísticos e de mineração de dados para que possam ser facilmente reutilizados e compartilhados. Confira o link abaixo para mais informações:https://docs.intersystems.com/irislatest/csp/docbook/DocBook.UI.Page.cls?KEY=APMML
Qual é o primeiro passo?
Assim como no exemplo do pôr do sol e do nascer do sol, precisamos de alguns dados para treinar nosso modelo
É essencial conhecer o objetivo dos dados e os valores que devem ser previstos. Também é fundamental ter dados claros, sem duplicatas. Você também deve descobrir qual é o conjunto mínimo de dados. Eu vou usar o provedor AutoML porque é da Intersystems, ha-ha 😉
Existem alguns tipos de algoritmos:
Árvores de decisão: Primeiro, a informação é classificada, depois a próxima pergunta é aplicada para avaliar a probabilidade. Exemplo: Vai chover amanhã? Verifique se o céu está nublado (muito ou pouco) ou limpo. Se estiver muito nublado, verifique a umidade. Depois disso, verifique a temperatura... Se estiver muito nublado, com alta umidade e baixa temperatura, então choverá amanhã.
Florestas aleatórias: É um conjunto de árvores de decisão, cada uma das quais "vota" em uma classe. A maioria dos votos define o modelo selecionado.
Redes neurais: Isso não significa que Skynet está chegando... No entanto, é muito complicado de explicar em poucas palavras. A ideia geral é "copiar" a função dos neurônios humanos. Isso significa que cada dado de entrada é analisado por um "neurônio", que, por sua vez, fornece os dados de entrada para o próximo "neurônio" analisar os dados de saída.
Se você deseja brincar com redes neurais usando Python, pode criar uma e verificar como funciona. Por favor, dê uma olhada em https://colab.research.google.com/drive/1XJ-Lph5auvoK1M4kcHZvkikOqZlmbytI?usp=sharing.
Através do link acima, você pode executar uma rotina em Python, com a ajuda da biblioteca TensorFlow. Para obter o padrão das tabelas A e B, faça o seguinte:
import tensorflow as tf
import numpy as np

tableA = np.array([1, 2, 3, 4, 5, 6, 7], dtype=float)
tableB = np.array([5, 7, 9, 11, 13, 15, 17], dtype=float)

hidden1 = tf.keras.layers.Dense(units=3, input_shape=[1])
hidden2 = tf.keras.layers.Dense(units=3)
exit = tf.keras.layers.Dense(units=1)
model = tf.keras.Sequential([hidden1, hidden2, exit])

model.compile(
    optimizer=tf.keras.optimizers.Adam(0.1),
    loss='mean_squared_error'
)

print("Start training...")
history = model.fit(tableA, tableB, epochs=1000, verbose=False)
print("Model trained!")

import matplotlib.pyplot as plt
plt.xlabel("# Epoch")
plt.ylabel("Loss magnitud")
plt.plot(history.history["loss"])

print("Doing a predicction!")
result = model.predict([100])
print("The result is " + str(result) )

print("Internal variables of the model")
print(hidden1.get_weights())
print(hidden2.get_weights())
print(exit.get_weights())
O código acima utiliza os valores de A e B para criar um modelo para comparar e descobrir a relação entre ambos os valores.
Quando a predição é feita, ela retorna o valor correto; neste exemplo, a predição é 203.
Como isso funciona no IRIS?
Machine Learning no IRIS é chamado de "integratedML". Ele foi implementado desde o InterSystems IRIS 2023.2 como um Recurso Experimental, o que significa que não é suportado para ambientes de produção. No entanto, o recurso é bem testado e a InterSystems acredita que ele pode agregar valor significativo aos clientes. Você pode encontrar mais informações na documentação Using integratedML.
Mesmo assim, como esta é uma lição de ML para iniciantes, explicarei como operá-lo da maneira mais simples possível.
Observação: Estou utilizando um Docker com uma imagem de containers.intersystems.com/iris-ml-community
docker pull containers.intersystems.com/iris-ml-communityVocê pode baixar a imagem do IRIS e os exemplos de https://github.com/KurroLopez/iris-mll-fordummies.
docker-compose exec iris iris session irisEstúdio da Universidade Sleepland
A Universidade Sleepland conduziu uma extensa pesquisa sobre insônia, realizando milhares de entrevistas e construindo um banco de dados com vários parâmetros de pacientes com e sem insônia.
Os dados coletados incluem o seguinte:
- Gênero (masculino/feminino)
- Idade (A idade da pessoa em anos)
- Ocupação (A ocupação ou profissão da pessoa)
- Duração do Sono (O número de horas que a pessoa dorme por dia)
- Qualidade do Sono (Uma avaliação subjetiva da qualidade do sono, variando de 1 a 10)
- Nível de Atividade Física (O número de minutos que a pessoa se dedica à atividade física diariamente)
- Nível de Estresse (Uma avaliação subjetiva do nível de estresse experimentado pela pessoa, variando de 1 a 10)
- Categoria de IMC (A categoria de IMC da pessoa: 1 Abaixo do Peso, Normal, Acima do Peso)
- Sistólica (Pressão arterial sistólica)
- Diastólica (Pressão arterial diastólica)
- Frequência Cardíaca (A frequência cardíaca em repouso da pessoa em BPM)
- Passos Diários (O número de passos que a pessoa dá por dia)
- Distúrbio do Sono (Nenhum, Insônia, Apneia do Sono)
Para a primeira amostra, eu criei uma classe (St.MLL.insomniaBase) com as colunas mencionadas acima:
Class St.MLL.insonmniaBase Extends %Persistent
{

/// Gender of patient (male/female)
Property Gender As %String;
/// The age of the person in years
Property Age As %Integer;
/// The occupation or profession of the person
Property Occupation As %String;
/// The number of hours the person sleeps per day
Property SleepDuration As %Numeric(SCALE = 2);
/// A subjective rating of the quality of sleep, ranging from 1 to 10
Property QualitySleep As %Integer;
/// The number of minutes the person engages in physical activity daily
Property PhysicalActivityLevel As %Integer;
/// A subjective rating of the stress level experienced by the person, ranging from 1 to 10
Property StressLevel As %Integer;
/// The BMI category of the person: Underweight, Normal, Overweight
Property BMICategory As %String;
/// Systolic blood pressure
Property Systolic As %Integer;
/// Diastolic blood pressure
Property Diastolic As %Integer;
/// The resting heart rate of the person in BPM
Property HeartRate As %Integer;
/// The number of steps the person takes per day
Property DailySteps As %Integer;
/// None, Insomnia, Sleep Apnea
Property SleepDisorder As %String;
}
Então, eu construí algumas classes que estendem de insomniaBase chamadas insomnia01, insomniaValidate01 e insomniaTest01. Isso me permitiu ter as mesmas colunas para cada tabela.
Eventualmente, precisaremos popular nossas tabelas com valores de exemplo, então eu projetei um método de classe para esse propósito.
Class St.MLL.insomnia01 Extends St.MLL.insomniaBase
{

/// Populate values
ClassMethod Populate() As %Status
{
    write "Init populate "_$CLASSNAME(),!
    &sql(TRUNCATE TABLE St_MLL.insomnia01)
……
    write $CLASSNAME()_" populated",!
    Return $$$OK
}
docker-compose exec iris iris session irisUsando o terminal, chame o método Populate desta classe.
Do ##class(St.MLL.insomnia01).Populate()Se fizermos tudo certo, teremos uma tabela com os valores para treinar nosso ML.
Também precisamos criar uma nova tabela para validação. É fácil porque você só precisará de uma parte dos dados fornecidos para o treinamento. Neste caso, serão 50% dos itens.
Por favor, execute a seguinte frase no terminal.
Do ##class(St.MLL.insomniaValidate01).Populate()Finalmente, prepararemos alguns dados de teste para ver os resultados do nosso treinamento.
Do ##class(St.MLL.insomniaTest01).Populate()Treine, treine e treine... você se tornará mais forte.
Agora, temos todos os dados necessários para treinar nosso modelo. Como fazer isso?
Você precisará apenas de 4 instruções simples:
CREATE MODELTRAIN MODELVALIDATE MODELSELECT PREDICT
Criação do modelo
CREATE MODEL cria os metadados do modelo de Machine Learning, especificando o nome do modelo, o campo alvo a ser previsto e o conjunto de dados que fornecerá o campo alvo.
Em nossa amostra, temos alguns parâmetros para avaliar distúrbios do sono, então projetaremos os seguintes modelos:
- insomnia01SleepModel:Por gênero, idade, duração do sono e qualidade do sono.
- Verifica se a idade e os hábitos de sono afetam algum tipo de distúrbio do sono.
- insomnia01BMIModel: Por gênero, idade, ocupação e categoria de IMC.
- Examina se idade, ocupação e IMC afetam algum tipo de distúrbio do sono.
- insomnia01AllModel: Todos os fatores.
- Inspeciona se todos os fatores afetam algum tipo de distúrbio do sono.
Vamos criar todos esses modelos agora.
Usando o gerenciamento SQL no portal IRIS, digite a seguinte frase:
CREATE MODEL insomnia01AllModel PREDICTING (SleepDisorder) From St_MLL.insomnia01
Neste ponto, nosso modelo sabe qual coluna prever.
Você pode verificar o que foi criado e o que a coluna de previsão contém com a seguinte frase:
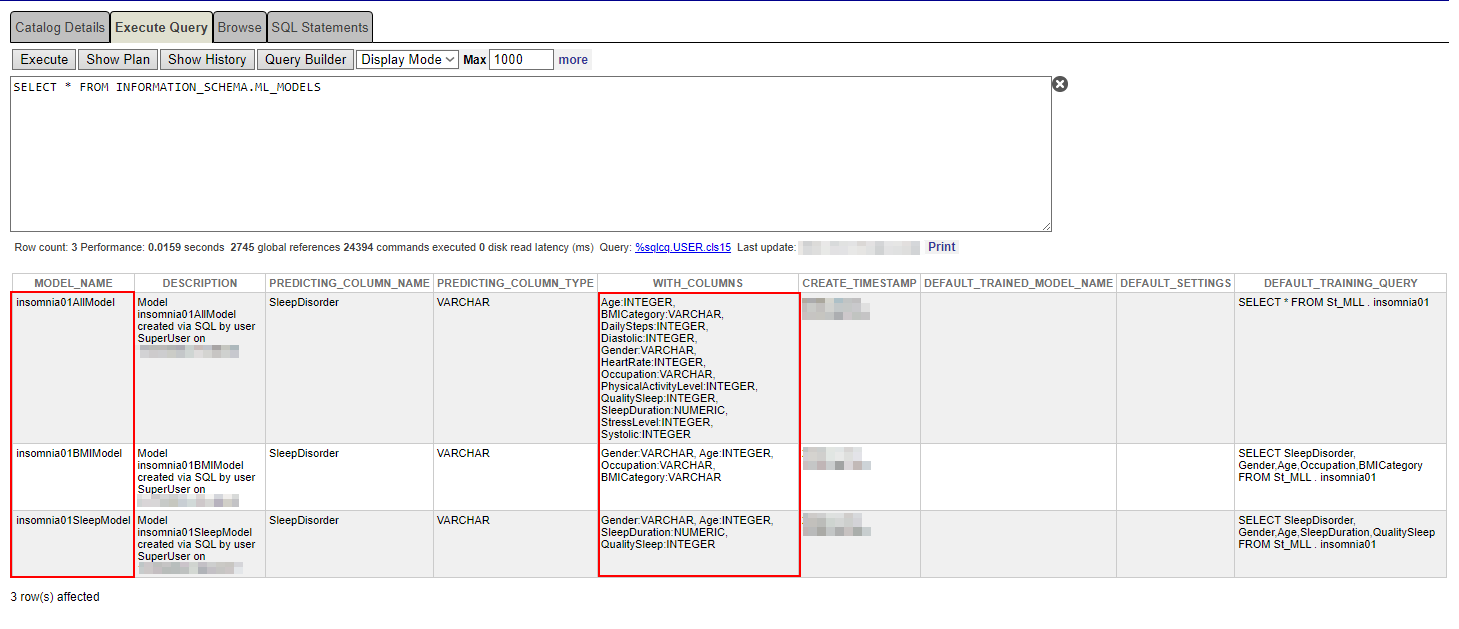
SELECT * FROM INFORMATION_SCHEMA.ML_MODELS 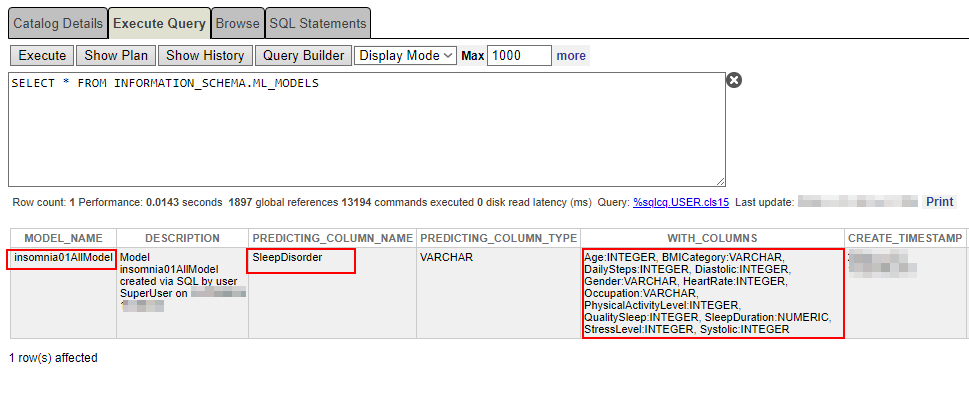
Certifique-se de que o nome da coluna de previsão e as próprias colunas estejam corretos.
No entanto, também queremos adicionar diferentes tipos de modelos, pois desejamos prever distúrbios do sono de acordo com outros fatores, não todos os campos
Neste caso, vamos usar a cláusula "WITH" para especificar as colunas que devem ser usadas como parâmetros para fazer a previsão.
Para utilizar a cláusula "WITH", devemos indicar o nome das colunas e seu tipo.
CREATE MODEL insomnia01SleepModel PREDICTING (SleepDisorder) WITH(Gender varchar, Age integer, SleepDuration numeric, QualitySleep integer) FROM St_MLL.insomnia01CREATE MODEL insomnia01BMIModel PREDICTING (SleepDisorder) WITH(Gender varchar, Age integer, Occupation varchar, BMICategory varchar) FROM St_MLL.insomnia01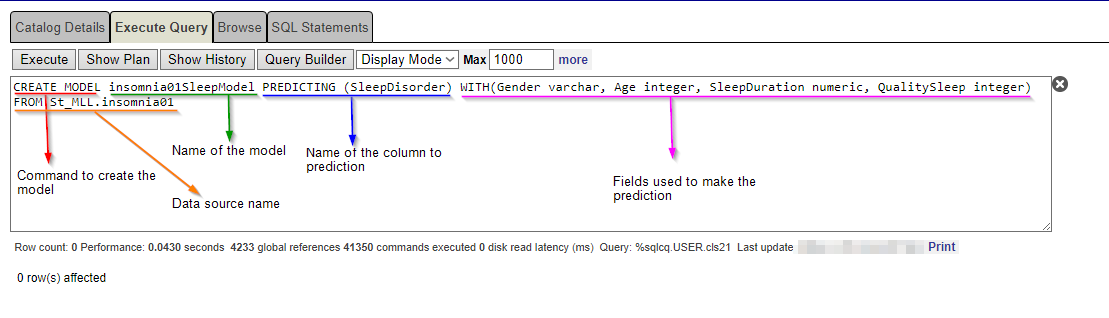 Certifique-se de que todos esses modelos foram criados com sucesso.
 Treinando o modelo
O comando TRAIN MODEL executa o mecanismo AutoML e especifica os dados que serão usados para o treinamento. A sintaxe FROM é genérica e permite que o mesmo modelo seja treinado várias vezes em diferentes conjuntos de dados. Por exemplo, você pode treinar uma tabela com dados da Universidade Sleepland ou da Universidade Napcity. A coisa mais importante, porém, é ter o modelo de dados com os mesmos campos, mesmo nome e mesmo tipo.
O mecanismo AutoML executa automaticamente todas as tarefas necessárias de aprendizado de máquina. Ele identifica recursos candidatos relevantes a partir dos dados selecionados, avalia tipos de modelos viáveis com base nos dados e na definição do problema e define hiperparâmetros para criar um ou mais modelos viáveis.
Como nosso modelo tem 50 registros, isso é suficiente para tal treinamento.
TRAIN MODEL insomnia01AllModel FROM St_MLL.insomnia01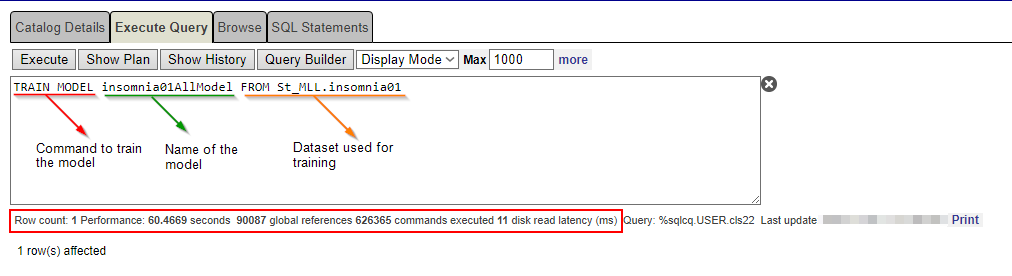
Faça o mesmo com os outros modelos.
TRAIN MODEL insomnia01SleepModel FROM St_MLL.insomnia01
TRAIN MODEL insomnia01BMIModel FROM St_MLL.insomnia01
Você pode descobrir se seu modelo foi treinado corretamente com a seguinte frase:
SELECT * FROM INFORMATION_SCHEMA.ML_TRAINED_MODELS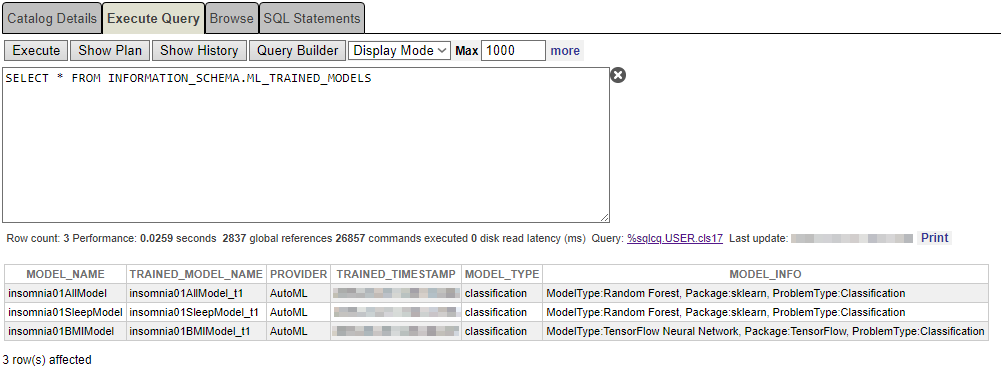
É necessário validar o modelo e o treinamento com o comando VALIDATE MODEL.
Validando o modelo
Nesta etapa, precisamos confirmar se o modelo foi treinado corretamente. Portanto, devemos executar o comando VALIDATE MODEL.
VALIDATE MODEL retorna métricas simples para modelos de regressão, classificação e séries temporais com base no conjunto de testes fornecido.
Verifique o que foi validado com a seguinte frase:
VALIDATE MODEL insomnia01AllModel From St_MLL.insomniaValidate01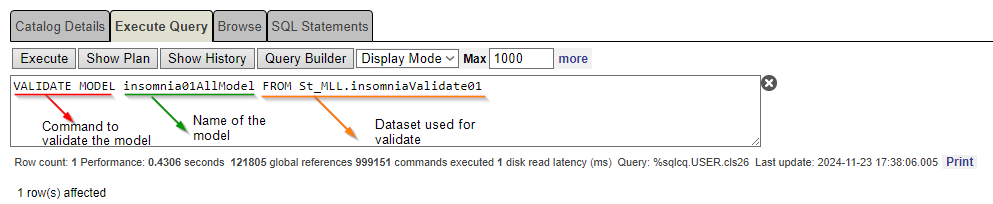
Repita com os outros modelos.
VALIDATE MODEL insomnia01SleepModel FROM St_MLL.insomniaValidate01
VALIDATE MODEL insomnia01BMIModel FROM St_MLL.insomniaValidate01
Consumindo o modelo
Agora, vamos consumir este modelo e verificar se o modelo aprendeu com precisão como produzir o valor do Resultado.
Com a ajuda da frase “SELECT PREDICT”, vamos prever qual será o valor do Resultado. Para isso, usaremos a tabela test1 populada anteriormente.
SELECT *, PREDICT(insomnia01AllModel) FROM St_MLL.insomniaTest01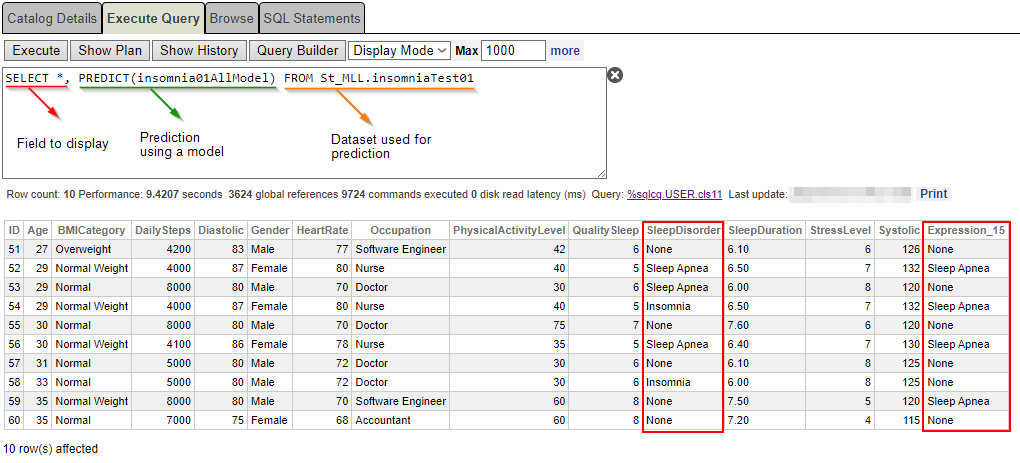 O resultado parece estranho depois de utilizar 50% dos dados explorados para treinar o modelo... Por que uma enfermeira de 29 anos foi diagnosticada com "insônia", enquanto o modelo previu "apneia do sono"? (veja o ID 54).
Devemos examinar outros modelos (insomnia01SleepModel e insomnia01BMIModel), criados com colunas diferentes, mas não se preocupe! Eu mostrarei as colunas usadas para projetá-los.
SELECT Gender, Age, SleepDuration, QualitySleep, SleepDisorder, PREDICT(insomnia01SleepModel) As SleepDisorderPrediction FROM St_MLL.insomniaTest01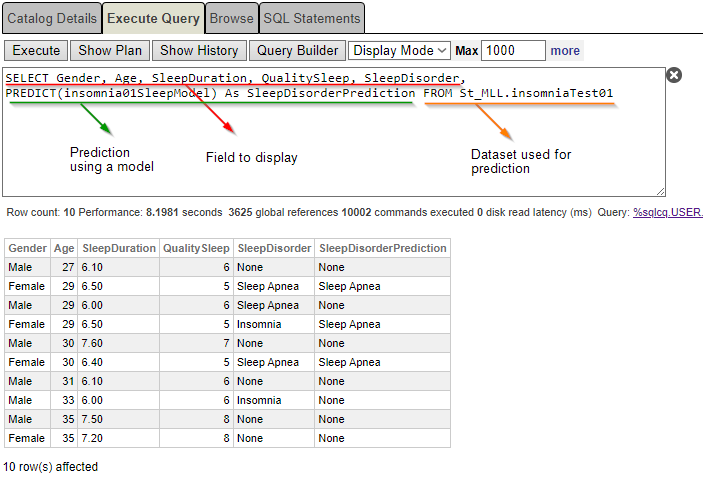
Você pode ver novamente que uma mulher de 29 anos foi diagnosticada com "insônia", enquanto a previsão indica "apneia do sono".
Ok, você está certo! Também precisamos saber qual porcentagem da previsão foi aplicada a este valor final.
Como podemos saber a porcentagem de uma previsão?
Para descobrir a porcentagem da previsão, devemos usar o comando “PROBABILITY”.
Este comando retorna um valor entre 0 e 1. No entanto, não é a probabilidade de previsão, é a probabilidade de obter o valor que você deseja verificar.
Este é um bom exemplo:
SELECT *, PREDICT(insomnia01AllModel) As SleepDisorderPrediction, PROBABILITY(insomnia01AllModel FOR 'Insomnia') as ProbabilityPrediction FROM St_MLL.insomniaTest01É a probabilidade de obter "Insônia" como um distúrbio do sono.
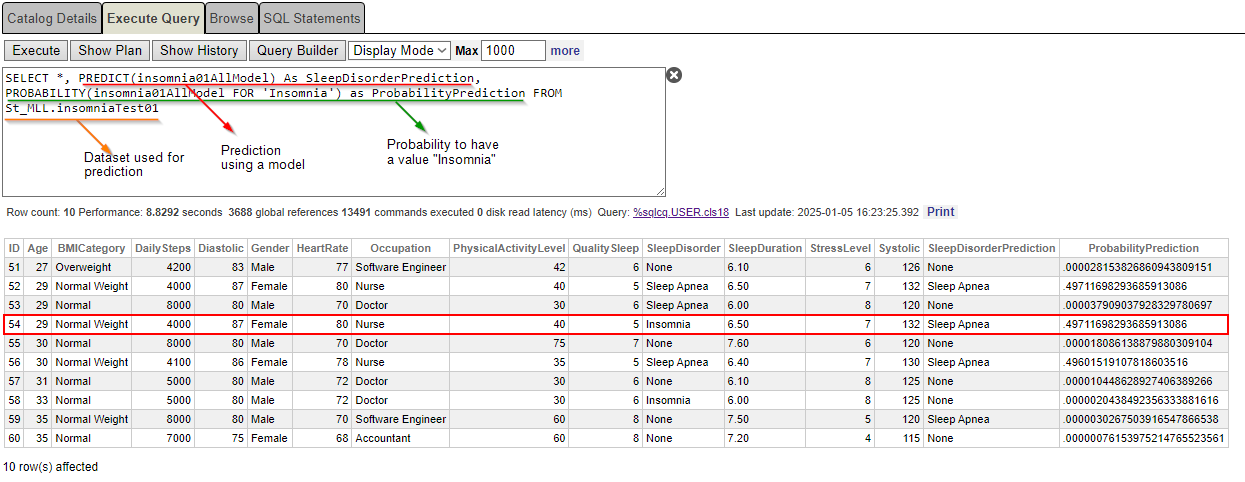 Nossa enfermeira, uma mulher de 29 anos, diagnosticada com "Insônia" tem 49,71% de chance de ter Insônia. Ainda assim, a previsão é "Apneia do Sono"...
Por quê? A probabilidade é a mesma para outros modelos?
SELECT Gender, Age, SleepDuration, QualitySleep, SleepDisorder, PREDICT(insomnia01SleepModel) As SleepDisorderPrediction, PROBABILITY(insomnia01SleepModel FOR 'Insomnia') as ProbabilityInsomnia,
PROBABILITY(insomnia01SleepModel FOR 'Sleep Apnea') as ProbabilityApnea
FROM St_MLL.insomniaTest01
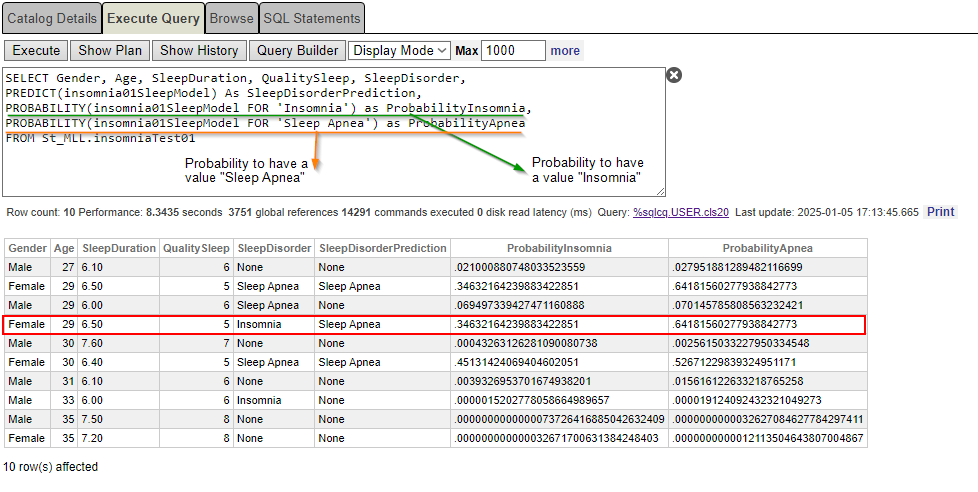
Finalmente, está um pouco mais claro agora. De acordo com os dados (sexo, idade, qualidade do sono e duração do sono), a probabilidade de ter insônia é de apenas 34,63%, enquanto a chance de ter apneia do sono é de 64,18%.
Uau... Isso é muito interessante! Ainda assim, estávamos explorando apenas uma pequena porção de dados inseridos diretamente em uma tabela com um método de classe... Como podemos carregar um arquivo enorme com dados?
Por favor, aguarde o próximo artigo!, ele está chegando em breve.