InterSystems IRIS se basa en una arquitectura que separa la organización lógica de los datos (namespaces - espacios de nombres) de su ubicación física de almacenamiento (bases de datos). Comprender esta separación y la distinción entre espacios de nombres y bases de datos es fundamental para una gestión de datos eficaz, la seguridad y, especialmente, para compartir datos con alto rendimiento.
En este artículo, explicaré estos componentes fundamentales y ofreceré una guía práctica sobre cómo aprovechar los mapeos de globals para compartir estructuras de datos nativas (globals) entre diferentes entornos lógicos.
Bases de datos: la realidad física
Una base de datos representa la realidad física de dónde se almacenan los datos en el disco. Antes que nada, es un archivo en un sistema de archivos llamado IRIS.dat (por ejemplo, <carpeta de instalación>\mgr\user\IRIS.DAT). El tamaño máximo de este archivo es de 32 TB. Es el contenedor de todos los datos y del código. Las bases de datos son gestionadas por el núcleo de IRIS, que se encarga del caché, el registro en diario (journaling) y el registro de transacciones a nivel de archivo físico.
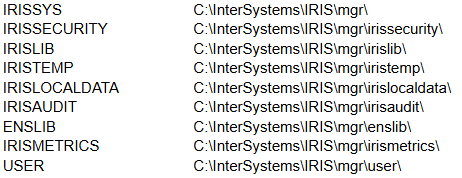
Al instalar el DBMS de InterSystems IRIS, se crean automáticamente las siguientes bases de datos:
Cuando trabajéis en un entorno de producción, se recomienda encarecidamente crear una base de datos dedicada, o varias, para almacenar vuestros datos y código.
Para crear una nueva base de datos, id a Sistema > Configuración > Bases de datos locales > Crear nueva base de datos y proporcionad un nombre y un directorio donde deba almacenarse:
.png)
Espacios de nombres: entorno lógico aislado
Un espacio de nombres en InterSystems IRIS representa un entorno de trabajo lógico y autónomo. Es análogo a un esquema en una base de datos relacional o a un espacio de trabajo de proyecto. Define el alcance de todos los elementos de la aplicación: clases persistentes (objetos), rutinas (código) y, lo más importante, globals (estructuras de datos nativas).
Además, las aplicaciones que se ejecutan en un espacio de nombres están lógicamente aisladas de las que se ejecutan en otro. Esto evita conflictos entre diferentes aplicaciones o entornos de desarrollo (por ejemplo, Desarrollo, Pruebas, Producción). Desde la perspectiva del desarrollador, todo, tanto datos como código, reside dentro del espacio de nombres al que están conectados. Cada proceso de aplicación de IRIS se ejecuta en un espacio de nombres. Si queréis acceder a datos o código en otro espacio de nombres, debéis cambiar a él de forma explícita.
Al instalar el DBMS de InterSystems IRIS, se crean automáticamente los siguientes espacios de nombres:
Mapeando la lógica a la física
El vínculo entre un espacio de nombres y una base de datos se establece mediante un mapeo. Cada espacio de nombres tiene un conjunto definido de mapeos que especifica qué base(s) de datos físicas se deben usar para almacenar sus elementos.
Por ejemplo, tenemos varias bases de datos:
- Clients – contiene datos sobre clientes
- Finances – contiene datos financieros que permiten trabajar tanto con clientes como con proveedores
- Vendors – contiene datos sobre proveedores
y dos espacios de nombres:
- Billing – tiene mapeo a Clients y parte o toda la información de Finances, lo que permite que las aplicaciones que trabajan en este espacio de nombres obtengan toda la información necesaria para gestionar a los clientes.
- Purchasing – tiene mapeo a Vendors y parte o toda la información de Finances, lo que permite que las aplicaciones que trabajan en este espacio de nombres obtengan toda la información necesaria para gestionar a los proveedores.
.png)
Al mismo tiempo, cada espacio de nombres tiene una base de datos predeterminada para datos y código.
En este ejemplo, podría ser:
.png)
Configuráis qué base de datos debe ser la predeterminada para el espacio de nombres al crear un espacio de nombres (Sistema > Configuración > Espacios de nombres > Nuevo espacio de nombres):

La base de datos para almacenamiento temporal será IRISTEMP por defecto.
La base de datos para Globals almacena los datos, mientras que la base de datos para Routines almacena el código y las descripciones de las clases.
Si queréis añadir más mapeos de datos a otras bases de datos, id a Sistema > Configuración > Espacios de nombres > (Elegid el espacio de nombres) > Mapeos de Globals > Nuevo y añadid un nuevo mapeo:
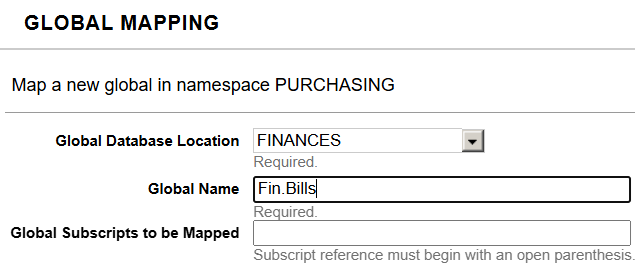
Como podéis ver, podéis configurar el acceso hasta en el más mínimo detalle, incluyendo los subíndices de globals concretos.
Lo mismo puede hacerse con los mapeos de Routines.
Además de los mapeos definidos por el usuario, también existen mapeos del sistema. El código y los datos a nivel de sistema (como definiciones de clases del sistema, rutinas y globals específicos del sistema que comienzan con ^%) se mapean a bases de datos del sistema (por ejemplo, IRISLIB, IRISSYS). Esto asegura que los datos de la aplicación no interfieran con los componentes centrales del sistema.
Al separar el espacio de nombres lógico de la base de datos física y utilizar mapeos, podéis obtener un control detallado sobre la ubicación de los datos, la seguridad y el rendimiento.
 418
418 32
32.png)