XSLT を使った docx の解析
Office ドキュメント(docx ドキュメント、xlsx 表計算、pptx プレゼンテーション)を処理するタスクは非常に複雑です。 この記事では、XSLT と ZIP のみを使用してドキュメントを解析、作成、および編集する方法を紹介します。
このトピックを記事にしたのは、 docx が最も一般的に使用されているドキュメント形式であり、この形式を生成して解析する機能は必ず役に立つからです。 「既製ライブラリ」によるソリューションでは、次の理由により面倒になる可能性があります。
- ライブラリが存在しない
- プロジェクトに別のブラックボックスは必要ない
- ライブラリの制限: プラットフォーム、機能など
- ライセンス
- 処理速度
この記事では、基本ツールのみを使用して、docx ドキュメントを操作します。
docx の構造 {.unchanged.rich-diff-level-one}
docx ドキュメントとは何でしょうか。 docx ファイルは、以下の 2 種類のファイルを物理的に含む zip アーカイブです。
- xml または rels 拡張子を持つ xml ファイル
- メディアファイル(画像など)
また、論理的には以下の 3 種類の要素が含まれます。
- コンテンツタイプ - ドキュメントに使用されているメディアタイプ(png など)とドキュメントのパーツ(ドキュメント、ページヘッダーなど)のリスト。
- パーツ - ドキュメントの個別のパーツ。 docx ドキュメントの場合、xml ドキュメントとメディアファイルを含む document.xml です。
- リレーションシップはリンク(ドキュメントのセクションとページのヘッダーの関係付け)できるようにドキュメントのパーツを識別し、外部パーツもここに定義されます(ハイパーリンクなど)。
この構造は、「ECMA-376: Office Open XML File Formats」に詳しく説明されています。メインとなるコンテンツは 5,000 ページにおよぶ PDF ドキュメントで、2,000 ページのボーナスコンテンツもあります。
最小限の docx {.unchanged.rich-diff-level-one}
解凍後の最も単純な docx は次のようになっています。
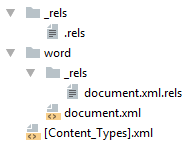
では、中を覗いてみましょう。
[Content_Types].xml {.unchanged.rich-diff-level-one}
このファイルはドキュメントルートにあり、ドキュメントに存在するすべての MIME タイプが一覧表示されています。
<Types xmlns="http://schemas.openxmlformats.org/package/2006/content-types">
<Default Extension="rels" ContentType="application/vnd.openxmlformats-package.relationships+xml"/>
<Default Extension="xml" ContentType="application/xml"/>
<Override PartName="/word/document.xml"
ContentType="application/vnd.openxmlformats-officedocument.wordprocessingml.document.main+xml"/>
</Types>
{.unchanged.rich-diff-level-one}
_rels/.rels {.unchanged.rich-diff-level-one}
ドキュメントパーツのメインのリストです。 この場合、定義されたリンクが 1 つだけ存在しています。rId1 識別子とドキュメントの本体である word/document.xml ファイルが対応付けられています。
<Relationships xmlns="http://schemas.openxmlformats.org/package/2006/relationships">
<Relationship
Id="rId1"
Type="http://schemas.openxmlformats.org/officeDocument/2006/relationships/officeDocument"
Target="word/document.xml"/>
</Relationships>
{.unchanged.rich-diff-level-one}
word/document.xml {.unchanged.rich-diff-level-one}
<w:document xmlns:w="http://schemas.openxmlformats.org/wordprocessingml/2006/main">
<w:body>
<w:p w:rsidR="005F670F" w:rsidRDefault="005F79F5">
<w:r>
<w:t>Test</w:t>
</w:r>
<w:bookmarkStart w:id="" w:name="_GoBack"/>
<w:bookmarkEnd w:id=""/>
</w:p>
<w:sectPr w:rsidR="005F670F">
<w:pgSz w:w="12240" w:h="15840"/>
<w:pgMar w:top="1440" w:right="1440" w:bottom="1440" w:left="1440"
w:header="720" w:footer="720" w:gutter=""/>
<w:cols w:space="720"/>
<w:docGrid w:linePitch="360"/>
</w:sectPr>
</w:body>
</w:document>
次のように分解できます。
- <w:document> - ドキュメントそのもの
- <w:body> - ドキュメント本文
- <w:p> - 段落
- <w:r> - テキストの断片
- <w:t> - テキストそのもの
- <w:sectPr> - ページの説明
このドキュメントをテキストエディターで開くと、「Test」という 1 つの単語が含まれるドキュメントが表示されます。
word/_rels/document.xml.rels {.unchanged.rich-diff-level-one}
word/document.xml 部分のリンクのリストが含まれます。 リンクファイルの名前は、ドキュメントパーツのファイル名から作成され、rels 拡張子が付けられます。 リンクファイルのあるフォルダは _rels と呼ばれ、関連しているパーツと同じ階層に配置されます。 word/document.xml にはリンクがないため、ファイルは空です。
<Relationships xmlns="http://schemas.openxmlformats.org/package/2006/relationships">
</Relationships>
リンクがない場合でも、このファイルは存在する必要があります。
docx と Microsoft Word {.unchanged.rich-diff-level-one}
Microsoft Word またはその他のエディタで作成された docx には、複数の追加ファイルが含まれます。
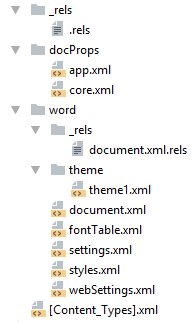
以下のような追加ファイルがあります。
- docProps/core.xml - Open Packaging Conventions と Dublin Core [1], [2] に準じた基本的なドキュメントメタデータ。
- docProps/app.xml - ドキュメントに関する一般情報: ページ数、語数、文字数、ドキュメントが作成されたアプリケーション数など。
- word/settings.xml - ドキュメントの設定
- word/styles.xml - ドキュメントに適用されているスタイル。 データとビューを分離します。
- word/webSettings.xml - HTML の表示設定と HTML へのドキュメント変換設定
- word/fontTable.xml - ドキュメントのフォントの一覧
- word/theme1.xml - テーマ(配色、フォント、書式設定)
複雑なドキュメントには通常、さらに多くのパーツが含まれます。
docx のリバースエンジニアリング {.unchanged.rich-diff-level-one}
最初のタスクでは、ドキュメントの断片が xml にどのように格納されているのかを調べ、そのようなドキュメント独自に作成(または解析)します。 以下のツールが必要です。
- Zip アーカイブツール
- XML 書式設定用ライブラリ(Word はインデントを使わずにすべてを 1 行で表示します)
- ファイル間の差分を表示するツール(私は git と TortoiseGit を使用しています)
ツール {.unchanged.rich-diff-level-one}
- Windows: zip、unzip、libxml2、git、TortoiseGit
- Linux: apt-get install zip unzip libxml2 libxml2-utils git
また、自動アーカイブと XML の書式設定を行うためのスクリプトも必要です。 Windows での使用:
- unpack file dir - ドキュメントファイルを dir フォルダに解凍して xml をフォーマットします。
- pack dir file - dir フォルダをドキュメントファイルに圧縮します
Linux での使用方法は上記に似ていますが、unpack の代わりに ./unpack.sh、pack の代わりに ./pack を使用します。
{.unchanged.rich-diff-level-one}
使用方法 {.unchanged.rich-diff-level-one}
変更を検索するには、次のように行います。
例 1. 太字テキスト {.unchanged.rich-diff-level-one}
最初の例として、テキストを太字にするタグを検索します。
- 通常の(太字でない)テキスト「Test」を含む bold.docx ドキュメントを作成します。
- そのドキュメントを解凍します(unpack bold.docx bold)。
- 結果をコミットします。
- 「Test」テキストを太字にします。
- そのドキュメントを解凍します(unpack bold.docx bold)。
- 最初の差分は次のようになります。
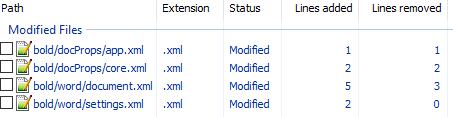
詳しく調べてみましょう。
docProps/app.xml {.unchanged.rich-diff-level-one}
@@ -1,9 +1,9 @@
-  <TotalTime>0</TotalTime>
+  <TotalTime>1</TotalTime>
時間の変更は不要です。
docProps/core.xml {.unchanged.rich-diff-level-one}
@@ -4,9 +4,9 @@
-  <cp:revision>1</cp:revision>
+  <cp:revision>2</cp:revision>
<dcterms:created xsi:type="dcterms:W3CDTF">2017-02-07T19:37:00Z</dcterms:created>
-  <dcterms:modified xsi:type="dcterms:W3CDTF">2017-02-07T19:37:00Z</dcterms:modified>
+  <dcterms:modified xsi:type="dcterms:W3CDTF">2017-02-08T10:01:00Z</dcterms:modified>
ドキュメントバージョンと変更日の変更は無関係です。
word/document.xml {.unchanged.rich-diff-level-one}
@@ -1,24 +1,26 @@
<w:body>
-    <w:p w:rsidR="0076695C" w:rsidRPr="00290C70" w:rsidRDefault="00290C70">
+    <w:p w:rsidR="0076695C" w:rsidRPr="00F752CF" w:rsidRDefault="00290C70">
<w:pPr>
<w:rPr>
+          <w:b/>
<w:lang w:val="en-US"/>
</w:rPr>
</w:pPr>
-      <w:r>
+      <w:r w:rsidRPr="00F752CF">
<w:rPr>
+          <w:b/>
<w:lang w:val="en-US"/>
</w:rPr>
<w:t>Test</w:t>
</w:r>
<w:bookmarkStart w:id="0" w:name="_GoBack"/>
<w:bookmarkEnd w:id="0"/>
</w:p>
-    <w:sectPr w:rsidR="0076695C" w:rsidRPr="00290C70">
+    <w:sectPr w:rsidR="0076695C" w:rsidRPr="00F752CF">
w:rsidR の変更は不要です。これは Microsoft Word が使用するユーティリティ情報です。 メインの変更は次の部分です。
<w:rPr>
+          <w:b/>
これは「Test」のある段落です。 明らかに、<w:b/> 要素がテキストを太字にしています。 この変更を保存して、残りを元に戻しましょう。
word/settings.xml {.unchanged.rich-diff-level-one}
@@ -1,8 +1,9 @@
+  <w:proofState w:spelling="clean"/>
@@ -17,10 +18,11 @@
+    <w:rsid w:val="00F752CF"/>
太字に関連するものは何も含まれていません。 元に戻します。
7. 関連性のある 1 つの変更(<w:b/> の追加)でフォルダを圧縮して、そのドキュメントが開き、期待どおりに開くことを確認します。 8. 変更をコミットします。
例 2. フッター {.unchanged.rich-diff-level-one}
より複雑な例に映りましょう。ドキュメントにフッターを追加します。 最初のコミットを行います。 「123」というフッターテキストを追加して、ドキュメントを解凍します。 最初の差分は次のようになります。

最初の例と同じように、docProps/app.xml と docProps/core.xml への変更をすぐに元に戻します。
[Content_Types].xml {.unchanged.rich-diff-level-one}
@@ -4,10 +4,13 @@
<Default Extension="xml" ContentType="application/xml"/>
<Override PartName="/word/document.xml" ContentType="application/vnd.openxmlformats-officedocument.wordprocessingml.document.main+xml"/>
+  <Override PartName="/word/footnotes.xml" ContentType="application/vnd.openxmlformats-officedocument.wordprocessingml.footnotes+xml"/>
+  <Override PartName="/word/endnotes.xml" ContentType="application/vnd.openxmlformats-officedocument.wordprocessingml.endnotes+xml"/>
+  <Override PartName="/word/footer1.xml" ContentType="application/vnd.openxmlformats-officedocument.wordprocessingml.footer+xml"/>
フッターは明らかに必要なものに見えますが、脚注と文末脚注はどうすればよいのでしょうか。 フッターの追加に必要なものでしょうか。それとも同時に作成された単なる副産物なのでしょうか。 この答えを見つけるのは必ずしも簡単なことではありません。以下に主なアプローチを示します。
- 変更を調べる。変更内容は互いに関連していますか?
- 実験する。
- 最後に、何が起きているのかを理解できない場合は、次を行います。
word/_rels/document.xml.rels {.unchanged.rich-diff-level-one}
最初の差分は次のようになります。
@@ -1,8 +1,11 @@ <Relationships xmlns="http://schemas.openxmlformats.org/package/2006/relationships">+ <Relationship Id="rId5" Type="http://schemas.openxmlformats.org/officeDocument/2006/relationships/theme" Target="theme/theme1.xml"/> <Relationship Id="rId3" Type="http://schemas.openxmlformats.org/officeDocument/2006/relationships/webSettings" Target="webSettings.xml"/> + <Relationship Id="rId4" Type="http://schemas.openxmlformats.org/officeDocument/2006/relationships/fontTable" Target="fontTable.xml"/> <Relationship Id="rId2" Type="http://schemas.openxmlformats.org/officeDocument/2006/relationships/settings" Target="settings.xml"/> <Relationship Id="rId1" Type="http://schemas.openxmlformats.org/officeDocument/2006/relationships/styles" Target="styles.xml"/> - <Relationship Id="rId5" Type="http://schemas.openxmlformats.org/officeDocument/2006/relationships/theme" Target="theme/theme1.xml"/> - <Relationship Id="rId4" Type="http://schemas.openxmlformats.org/officeDocument/2006/relationships/fontTable" Target="fontTable.xml"/> + <Relationship Id="rId6" Type="http://schemas.openxmlformats.org/officeDocument/2006/relationships/footer" Target="footer1.xml"/> + <Relationship Id="rId7" Type="http://schemas.openxmlformats.org/officeDocument/2006/relationships/endnotes" Target="endnotes.xml"/> + <Relationship Id="rId8" Type="http://schemas.openxmlformats.org/officeDocument/2006/relationships/footnotes" Target="footnotes.xml"/> </Relationships>
一部の変更は、Word がリンク順を変更したことが原因であることがわかるため、その順序を復元して差分を絞り込みましょう。
@@ -3,6 +3,9 @@
+  <Relationship Id="rId6" Type="http://schemas.openxmlformats.org/officeDocument/2006/relationships/footer" Target="footer1.xml"/>
+  <Relationship Id="rId7" Type="http://schemas.openxmlformats.org/officeDocument/2006/relationships/endnotes" Target="endnotes.xml"/>
+  <Relationship Id="rId8" Type="http://schemas.openxmlformats.org/officeDocument/2006/relationships/footnotes" Target="footnotes.xml"/>
再びフッター、脚注、文末脚注が表示されます。 これらはすべてメインのドキュメントに関連付けられているため、確認してみましょう。
word/document.xml {.unchanged.rich-diff-level-one}
@@ -15,10 +15,11 @@
</w:r>
<w:bookmarkStart w:id="0" w:name="_GoBack"/>
<w:bookmarkEnd w:id="0"/>
</w:p>
<w:sectPr w:rsidR="0076695C" w:rsidRPr="00290C70">
+      <w:footerReference w:type="default" r:id="rId6"/>
<w:pgSz w:w="11906" w:h="16838"/>
<w:pgMar w:top="1134" w:right="850" w:bottom="1134" w:left="1701" w:header="708" w:footer="708" w:gutter="0"/>
<w:cols w:space="708"/>
<w:docGrid w:linePitch="360"/>
</w:sectPr>
変更については、sectPr のフッターへの明示的なリンクのみが必要な変更として存在しています。 ドキュメントには脚注や文末脚注へのリンクは存在しないため、それらは必要ないと考えられます。
word/settings.xml {.unchanged.rich-diff-level-one}
@@ -1,19 +1,30 @@ <w:settings xmlns:w="http://schemas.openxmlformats.org/wordprocessingml/2006/main"> <w:zoom w:percent="100"/>+ <w:proofState w:spelling="clean"/> <w:defaultTabStop w:val="708"/> <w:characterSpacingControl w:val="doNotCompress"/> + <w:footnotePr> + <w:footnote w:id="-1"/> + <w:footnote w:id="0"/> + </w:footnotePr> + <w:endnotePr> + <w:endnote w:id="-1"/> + <w:endnote w:id="0"/> + </w:endnotePr> <w:compat> <w:compatSetting w:name="compatibilityMode" w:uri="http://schemas.microsoft.com/office/word" w:val="15"/> <w:compatSetting w:name="overrideTableStyleFontSizeAndJustification" w:uri="http://schemas.microsoft.com/office/word" w:val="1"/> <w:compatSetting w:name="enableOpenTypeFeatures" w:uri="http://schemas.microsoft.com/office/word" w:val="1"/> <w:compatSetting w:name="doNotFlipMirrorIndents" w:uri="http://schemas.microsoft.com/office/word" w:val="1"/> <w:compatSetting w:name="differentiateMultirowTableHeaders" w:uri="http://schemas.microsoft.com/office/word" w:val="1"/> </w:compat> <w:rsids> <w:rsidRoot w:val="00290C70"/> + <w:rsid w:val="000A7B7B"/> + <w:rsid w:val="001B0DE6"/>
設定には、ドキュメントに追加されると想定される脚注と文末脚注へのリンクがリストされています。 ここにはフッターは表示されていないことに注意してください。
{.unchanged.rich-diff-level-one}
word/styles.xml {.unchanged.rich-diff-level-one}
@@ -480,6 +480,50 @@
<w:rFonts w:ascii="Times New Roman" w:hAnsi="Times New Roman"/>
<w:b/>
<w:sz w:val="28"/>
</w:rPr>
</w:style>
+  <w:style w:type="paragraph" w:styleId="a4">
+    <w:name w:val="header"/>
+    <w:basedOn w:val="a"/>
+    <w:link w:val="a5"/>
+    <w:uiPriority w:val="99"/>
+    <w:unhideWhenUsed/>
+    <w:rsid w:val="000A7B7B"/>
+    <w:pPr>
+      <w:tabs>
+        <w:tab w:val="center" w:pos="4677"/>
+        <w:tab w:val="right" w:pos="9355"/>
+      </w:tabs>
+      <w:spacing w:after="0" w:line="240" w:lineRule="auto"/>
+    </w:pPr>
+  </w:style>
+  <w:style w:type="character" w:customStyle="1" w:styleId="a5">
+    <w:name w:val="Верхний колонтитул Знак"/>
+    <w:basedOn w:val="a0"/>
+    <w:link w:val="a4"/>
+    <w:uiPriority w:val="99"/>
+    <w:rsid w:val="000A7B7B"/>
+  </w:style>
+  <w:style w:type="paragraph" w:styleId="a6">
+    <w:name w:val="footer"/>
+    <w:basedOn w:val="a"/>
+    <w:link w:val="a7"/>
+    <w:uiPriority w:val="99"/>
+    <w:unhideWhenUsed/>
+    <w:rsid w:val="000A7B7B"/>
+    <w:pPr>
+      <w:tabs>
+        <w:tab w:val="center" w:pos="4677"/>
+        <w:tab w:val="right" w:pos="9355"/>
+      </w:tabs>
+      <w:spacing w:after="0" w:line="240" w:lineRule="auto"/>
+    </w:pPr>
+  </w:style>
+  <w:style w:type="character" w:customStyle="1" w:styleId="a7">
+    <w:name w:val="Нижний колонтитул Знак"/>
+    <w:basedOn w:val="a0"/>
+    <w:link w:val="a6"/>
+    <w:uiPriority w:val="99"/>
+    <w:rsid w:val="000A7B7B"/>
+  </w:style>
</w:styles>
スタイルの変更を探している場合にのみ、スタイルの変更に注目します。 この場合、変更を元に戻すことができます。
word/footer1.xml {.unchanged.rich-diff-level-one}
フッターそのものを確認します(可読性の目的で、一部のネームスペースは省略されていますが、ドキュメント内に存在する必要があります)。
<w:ftr xmlns:w="http://schemas.openxmlformats.org/wordprocessingml/2006/main">
<w:p w:rsidR="000A7B7B" w:rsidRDefault="000A7B7B">
<w:pPr>
<w:pStyle w:val="a6"/>
</w:pPr>
<w:r>
<w:t>123</w:t>
</w:r>
</w:p>
</w:ftr>
フッターのテキストは「123」です。 この例ではスタイルの変更を追跡していないため、<w:pStyle w:val="a6"/> へのリンクを削除する必要があります。
すべての変更の分析から、次のような仮定が導かれます。
- 脚注と文末脚注は不要である。
- word/footer1.xml ファイルを追加する必要がある。
- [Content_Types].xml にフッターへのリンクを追加する必要がある。
- word/_rels/document.xml.rels にフッターへのリンクを追加する必要がある。
- word/document.xml の <w:sectPr> タグに <w:footerReference> を追加する必要がある。
これらの仮定により、差分は次の変更セットに縮小されます。
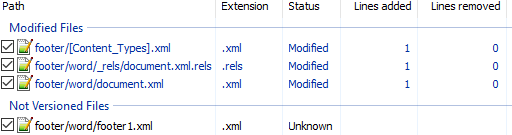
次に、ドキュメントを圧縮して開きます。 すべてが正しく行われると、ドキュメントが開き、テキスト「123」というフッターが表示されます。 これが最終的なコミットです。
したがって、変更を検出するプロセスは、目的の結果を達成する上で十分な最小限の変更セットを決定するまでに縮小されています。
実践 {.unchanged.rich-diff-level-one}
必要な変更を特定したら、次の段階へ進むのが論理的と言えます。次のいずれかの作業に進むことができます。
- docx の作成
- docx の解析
- docx の変換
そして、それを行うには、XSLT と XPath が必要となります。
ドキュメントのフッターを置換または追加する非常に単純な変換を書いてみましょう。
アルゴリズム {.unchanged.rich-diff-level-one}
アルゴリズムは次のようになります。
[Content_Types].xml と word/_rels/document.xml.rels にそのフッターへのリンクを追加する。
word/document.xml の各 <w:sectPr> に、フッターへの参照を含む <w:footerReference> タグを追加するか置換する。
それでは始めましょう。
解凍 {.unchanged.rich-diff-level-one}
Caché ObjectScript では、$zf(-1, oscommand) 関数を使用して、オペレーティングシステムのコマンドを実行することができます。 wrapper over $zf(-1) を使用して、unzip を呼び出し、ドキュメントを解凍します。
/// Using %3 (unzip) unpack file %1 in folder %2
Parameter UNZIP = "%3 %1 -d %2";
/// Unpack archive source in folder targetDir
ClassMethod executeUnzip(source, targetDir) As %Status
{
set timeout = 100
set cmd = $$$FormatText(..#UNZIP, source, targetDir, ..getUnzip())
return ..execute(cmd, timeout)
}
フッターファイルの作成 {.unchanged.rich-diff-level-one}
入力はフッターテキストを受け取ります。そのテキストを in.xml ファイルに書き込みます。
<xml>TEST</xml>
XSLT(footer.xsl ファイル)では、xml タグのテキストを使ってフッターを作成します(一部のネームスペースは省略されています。こちらが全リストです)。
<xsl:stylesheet
xmlns:xsl="http://www.w3.org/1999/XSL/Transform"
xmlns="http://schemas.openxmlformats.org/package/2006/relationships" version="1.0">
<xsl:output method="xml" omit-xml-declaration="no" indent="yes" standalone="yes"/>
<xsl:template match="/">
<w:ftr xmlns:w="http://schemas.openxmlformats.org/wordprocessingml/2006/main">
<w:p>
<w:r>
<w:rPr>
<w:lang w:val="en-US"/>
</w:rPr>
<w:t>
<xsl:value-of select="//xml/text()"/>
</w:t>
</w:r>
</w:p>
</w:ftr>
</xsl:template>
</xsl:stylesheet>
XSLT コンバータを呼び出します。
do ##class(%XML.XSLT.Transformer).TransformFile("in.xml", "footer.xsl", footer0.xml")
footer0.xml フッターファイルが結果となります。
<w:ftr xmlns:w="http://schemas.openxmlformats.org/wordprocessingml/2006/main">
<w:p>
<w:r>
<w:rPr>
<w:lang w:val="en-US"/>
</w:rPr>
<w:t>TEST</w:t>
</w:r>
</w:p>
</w:ftr>
メインドキュメントのリンクのリストにフッターリンクを追加する {.unchanged.rich-diff-level-one}
rId0 ID のリンクは通常、存在しません。 ただし、XPath を使用すると、存在しない ID を取得することができます。 word/_rels/document.xml.rels に rId0 ID を持つ footer0.xml へのリンクを追加します。
<xsl:stylesheet xmlns:xsl="http://www.w3.org/1999/XSL/Transform" xmlns="http://schemas.openxmlformats.org/package/2006/relationships" version="1.0">
<xsl:output method="xml" omit-xml-declaration="yes" indent="no" />
<xsl:param name="new">
<Relationship
Id="rId0"
Type="http://schemas.openxmlformats.org/officeDocument/2006/relationships/footer"
Target="footer0.xml"/>
</xsl:param>
<xsl:template match="/*">
<xsl:copy>
<xsl:copy-of select="$new"/>
<xsl:copy-of select="@* | node()"/>
</xsl:copy>
</xsl:template>
</xsl:stylesheet>
ドキュメント内のリンクを指定する {.unchanged.rich-diff-level-one}
次に、<w:sectPr> タグに <w:footerReference> タグを追加するか、その中のリンクをフッターへのリンクに置き換える必要があります。 それぞれの <w:sectPr> タグには、最初のページ、偶数ページ、およびそれ以外のページ用に 3 つの異なる <w:footerReference> タグを使用できることがわかります。
<xsl:stylesheet xmlns:xsl="http://www.w3.org/1999/XSL/Transform"
xmlns:r="http://schemas.openxmlformats.org/officeDocument/2006/relationships"
xmlns:w="http://schemas.openxmlformats.org/wordprocessingml/2006/main"
version="1.0">
<xsl:output method="xml" omit-xml-declaration="yes" indent="yes" />
<xsl:template match="//@* | //node()">
<xsl:copy>
<xsl:apply-templates select="@"/>
<xsl:apply-templates select="node()"/>
</xsl:copy>
</xsl:template>
<xsl:template match="//w:sectPr">
<xsl:element name="{name()}" namespace="{namespace-uri()}">
<xsl:copy-of select="./namespace::"/>
<xsl:apply-templates select="@"/>
<xsl:copy-of select="./[local-name() != 'footerReference']"/>
<w:footerReference w:type="default" r:id="rId0"/>
<w:footerReference w:type="first" r:id="rId0"/>
<w:footerReference w:type="even" r:id="rId0"/>
</xsl:element>
</xsl:template>
</xsl:stylesheet>
[Content_Types].xml にフッターを追加する {.unchanged.rich-diff-level-one}
[Content_Types].xml に /word/footer0.xml は application/vnd.openxmlformats-officedocument.wordprocessingml.footer+xml であるという情報を追加します。
<xsl:stylesheet xmlns:xsl="http://www.w3.org/1999/XSL/Transform" xmlns="http://schemas.openxmlformats.org/package/2006/content-types" version="1.0">
<xsl:output method="xml" omit-xml-declaration="yes" indent="no" />
<xsl:param name="new">
<Override
PartName="/word/footer0.xml"
ContentType="application/vnd.openxmlformats-officedocument.wordprocessingml.footer+xml"/>
</xsl:param>
<xsl:template match="/*">
<xsl:copy>
<xsl:copy-of select="@* | node()"/>
<xsl:copy-of select="$new"/>
</xsl:copy>
</xsl:template>
</xsl:stylesheet>
結果 {.unchanged.rich-diff-level-one}
完全なコードは GitHub にあります。 次のように動作します。
do ##class(Converter.Footer).modifyFooter("in.docx", "out.docx", "TEST")
上記の引数には次のような意味があります。
-
in.docx - 元のドキュメント
-
out.docx - 出力ドキュメント
-
TEST - フッターに追加されるテキスト
まとめ {.unchanged.rich-diff-level-one}
XSLT と ZIP を使用するだけで、docx ドキュメント、xlsx 表計算、および pptx プレゼンテーションを正しく処理することができます。
オープンクエスチョン {.unchanged.rich-diff-level-one}
-
xlsx や docx を生成しますか?それとも解析しますか? どのようにして行いますか?
-
バージョン 5 の ECMA-367 スキーマとコメントを含む XSD ファイルを探しています。 バージョン 5 の XSD は ECMA サイトからダウンロードできますが、 コメントなしで理解するのは困難です。 バージョン 2 の XSD はコメント付きで提供されています。
リンク {.unchanged.rich-diff-level-one}